

Isn’t it a wonderful thought to be able to share your crafting passion with others and inspire them? Starting a craft blog could be the best way to do that.
But the question that arises is, “How to start a craft blog?”
It might seem a bit daunting at first, but with the right guidance, it is quite achievable.
In this guide, I’ll walk you through all the steps you need to start your own craft blog and bring your craft to a wider audience.
Editors Note
This guide is extremely DETAILED and explains everything you need to start a Craft blog. I’ve been at this blogging stuff for over 8 years and have built a business making $20,000 per month, so I have a lot of helpful advice for you newbies out there.
If you get stuck or need advice, I HIGHLY recommend that you get my 100% FREE blogging course by clicking here. If that doesn’t help please contact me directly and I’ll help you out for free.
How to Start a Craft Blog in 10 Steps:
If you just need someone to walk you through setting up your blog quickly and easily, check out step 5.
Crafting has never been more popular, and many sites will help you sell your crafts. For example, one of the largest eCommerce platforms for crafters, Etsy, has seen its revenue skyrocket over the last few years.
How much has it grown? In 2012, Etsy brought in 74.6 million dollars in revenue. In 2020, that number jumped to over 1.7 billion dollars.

As a crafter, you might think about listing your goods on Etsy. However, you should be aware that Etsy will take 15% of all income made on their site unless you sell over $10,000 worth of goods. Then, they’ll only take 12% (how nice of them…lol).
But if you build your own website and blog, you don’t have to worry about these fees. Not only can you sell your crafts directly to buyers, but you can also market your goods on your own blog much more effectively than if you used Etsy, Amazon Associates, eBay, or some other third-party eCommerce site.
Many people who start a craft blog hope to make money as big as earning from a full-time job each month.
However, there are many other reasons you might want to start your very own craft blog.
- Let your voice be heard
- Build your resume
- Improve your writing skills
- Make money
- Do something you love
- Share handy skills with others
- Build your own business online by creating products
- Educate others
- Share interesting findings
- Get noticed in the Craft community
- Discuss DIY project
Whatever the reasons for you choosing to learn how to start a craft blog, you can rest assured this will be an exciting undertaking that will likely transform your life and craft business completely.
1. Decide the Focus of Your Craft Blog
First, you need to decide on the focus of your blog.
What direction will it take?
There are many different ways you can position your craft blog, some of which are listed below:
- Trying crafting instructions and reporting results
- Creating crafting templates to sell
- Innovation in the Craft community
- Having a complimentary blog for a YouTube channel
- Growing a craft community
Use the list above to help you jumpstart your brainstorming process.
Think of the best craft blogs you enjoy reading if you find it hard to decide in any direction. This may help you determine what you find most interesting and help you determine what your blog’s focus should be.
2. Choose Your Crafting Niche
Your next step in creating your blog is to choose your craft niche. A niche is simply a segment of a larger market to better provide a service.
The crafting industry has A LOT of different niches.
Here are some popular examples of niche craft blogs:
- Recycled Paper Crafts
- Crafts for Toddlers and PreSchoolers
- Upcycled Crafts Blog
- Crochet Designs Blog
- Craft Reviews Blog
- DIY Home Decor / Houseware
- Sewing and Needlework Crafts
- Creative Handmade Gifts
- Flower Crafts
- Ceramics and glass crafts
- Fiber and Textile Crafts
- Leatherwork
- Teaching crafting to Moms
You might even choose one type of item in each niche to focus on, such as:
- Children’s Headbands
- Glass Pebble Magnets
- Palette Clock
- DIY Lace Bowls
- Decorative Champagne Flutes
- Flower Crowns
- Velvet Pillows
- Pallet Coasters
- Palette Picture Frames
- Beaded Bracelets
As you can see, there are tons of different areas you can choose from as your craft blog niche. You can also check out some of the best craft blogs out there for inspiration.
Once you’ve made your decision, move on to the next step
3. Choose Your Blogging Platform
A quick search online will show you dozens of blogging platforms (both free and paid) to choose from.
But, I’m going to make this easy for you and recommend my favorite blogging platform:
Self-hosted WordPress.
You may be wondering why I would suggest you get a premium WordPress blogging platform instead of using a free one.
Let me explain.
Free blogging platforms like Blogger, Wix, and Squarespace have a few drawbacks.
- You Don’t Own the Content: Your site can be taken down for any reason, meaning you’ll lose all the content you published on your own website.
- You Could Lose Followers: If you decide to move to a premium blogging platform later, you may lose a lot of followers when you change to the new domain and admin URL.
- Looks Unprofessional: A free blogging platform doesn’t look professional and does NOTHING to boost your credibility with your audience.
- You Can’t Fully Monetize: You are limited to the types of blog monetization methods (like display ads to gain ad revenue) that you can use with a free blogging platform.
But, you will experience none of these drawbacks with a premium WordPress blogging platform.
It comes with quite a lot of compelling benefits
Why choose self-hosted WordPress vs. free alternatives?
- Professional Looking Domain: Instead of a domain name that looks like “MyAwesomeCraftBlog (dot) com, “you will have an amateur-looking domain like “MyAwesomeCraftBlog.Squarespace (dot) com.”
- Thousands of Themes and Plugins: With WordPress, you have endless options for extending the basic functionality of your own website with a premium theme and custom theme.
- Full Website Monetization: You can employ ANY blog monetization strategy when using WordPress as your blogging platform.
In addition, WordPress is FREE for anyone to download and use forever.
And aside from the all-in-one features and WordPress dashboard, the blogging platform has exceptional customer support, which is excellent for building their first blog. In short, this is the logical choice for you if you want to start your craft blogging on the right foot.
4. Decide on Your Domain Name
Your domain name is simply what you will call your new craft blog. As part of starting a craft blog, this step is necessary.
Choosing the right name for your blog is crucial to the overall process, but you shouldn’t spend too much time on it.
You’ll be surprised how many people get stuck at this stage and never take action on their craft blogs.
So, avoid falling into this trap by setting aside an hour or two to complete this section and move on to the next step.
Here are the steps to help you choose a great domain name for your new blog:
1. Buy a “.com” Domain Name: Although there are a lot of craft-focused domain extensions, like. “DIY” and “.craft,” you’re better off going with “.com” as it’s the most commonly used and the easiest one for your audience to remember.
2. Choose a Broad Name: This will give you room for expansion as your blog grows, whereas a too narrow name will have a few downsides and constrict your content creation efforts.
3. Choose a Short Name: Your name should be short and sweet to make it easy for your audience to remember and type it in their browsers.
4. Use Alliteration: This involves choosing a name with the first two letters that sound the same, such as “Crafty Kids” or “Cool Crafts.”
5. Get Creative: If the name you want for your craft blog is already taken, you can try using synonyms of the word instead. You can also think about taking words from different languages to help you get a unique blog name. For instance, “Craft Girl” might become “Craft Chica.”
6. Add Extra Words: Still can’t get the name you want? Try adding extra words like “the “hub, “arena, “and so on. This will help you develop a version of your available blog name. For instance, “Curtain Crafts” might become “Curtain Crafts Arena.”
7. Think of a Concept: When choosing a name for your craft blog, it helps if you can think of a concept around the name. For instance, think of different branding ideas for your new blog. Where do you want to take it in the future? This will help you develop a relevant name that matches your blog’s true purpose.
8. Use Name Generation Tools: There are a lot of name generation tools online that will help you find a perfect name for your new blog. Some of my favorites include Instant Domain Search and Lean Domain Search.
9. Don’t Buy an Expensive Domain Name: A domain is your blog’s house, so why spend money on an expensive domain name when a standard domain name works just as well?
Instead, use that little money to create content and grow your blog. Then, once it’s profitable, you can purchase ANY domain name you want while you make money.
10. Don’t Get Stuck Here: Avoid spending too much time here. As previously mentioned, set aside a couple of hours to complete this task, even if its time-consuming, pick a name that you are happy with, and jump to the next step.
Examples of Popular Craft Blog Names (and why the names make sense)
1. Craft Gossip
This name is short and sweet. It describes precisely what visitors can look forward to on the blog: crafts and news on current events in the industry.
2. Crafty Chica
This blog dedicated to helping people explore glitter uses alliteration and a word from a different language to create a memorable name.
3. Craftberry Bush
This crafts and DIY blog has a unique name that is hard to forget.
4. Itsy Bitsy
This is yet another blog that uses alliteration for a name that will stick in the minds of its audience.
5. Felt Blog
This name is short and easy to remember. It’s descriptive of what the blog is about (working with felt fabrics).

5. Buy Your Domain Name and Hosting
The next step of my guide on how to start a craft blog is to buy the domain and choose a website host.
Your domain name is what you’re going to call your blog.
It’s also your address on the internet.
Of course, you can call your blog something different from your address, but it’s always best to use the same name for both to avoid confusing your visitors.
So, for instance, if you choose the name “Inspired Crafts” for your blog, your domain name will be “InspiredCrafts (dot) com.”
Hosting service refers to where your new craft blog will reside on the internet.
Hosting companies host (or store) your website files on their servers to ensure that your content is always available to visitors.
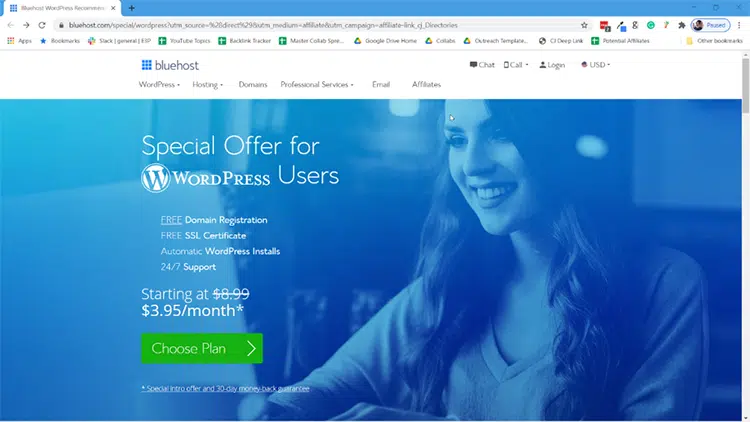
I recommend that you use BlueHost over other different companies offering a reliable hosting service provider with affordable services for new craft bloggers.
A lot of people start to freak out at this stage.
But don’t worry. I will help you through this entire process by providing a step-by-step guide.
Click this link to visit BlueHost and then follow along with the tutorial below:
Step 1: If you haven’t yet, click on this link, and you’ll be brought to the WordPress Hosting page that you see below.
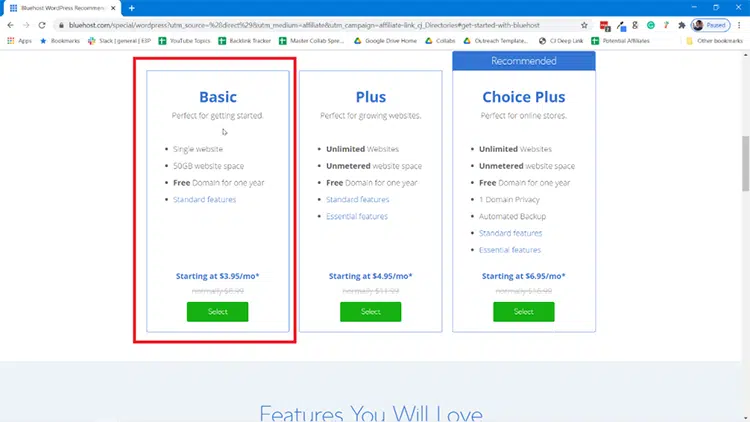
Step 2: Next, you’ll be brought to the hosting plan page. You could choose to get a “Plus” or “Choice Plus” plan, but that’s not a requirement.
The Startup plan is the cheapest at $2.95/month through my link vs. the normal $8.99/month.
This plan has everything you need including 50GB of webspace (plenty of room for your files), a free domain for a year, plus other standard features like a free SSL and a secure WordPress installed for you. Feel free to browse to decide on the right plan, but rest assured that Basic will work just fine if you want to minimize your investment.
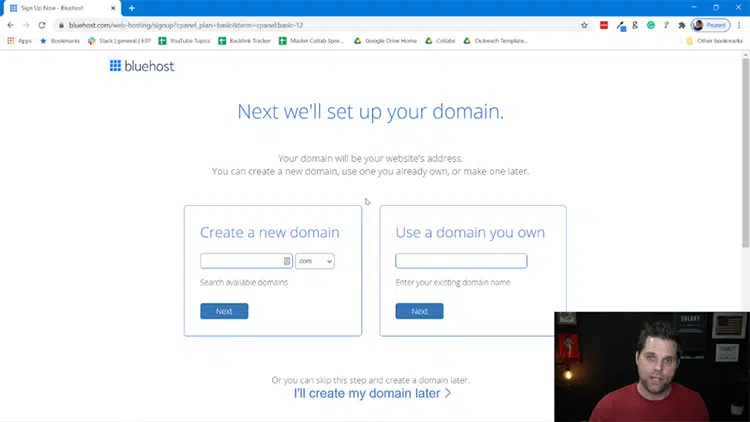
Step 3: After clicking on the plan, you’ll be brought to the next page where you will type in your new domain, or you can just choose “I’ll create my domain later” if you haven’t decided on one yet. The domain is the URL people will type into a browser to view your website in the future.
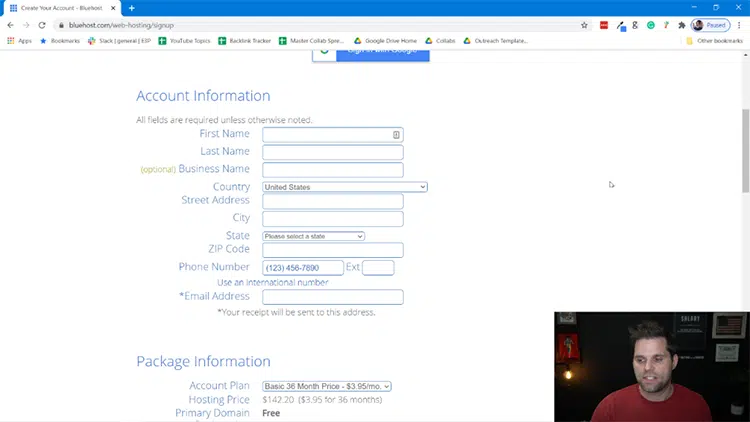
Step 4: Once you submit, the next page will ask for your information. That will start with your account information, which is self-explanatory.
Step 5: Next, you’ll have to input your Package Information. This is to choose how long you want the plan to go. I advise you to choose 24 months to get the discount and save some and make money, but you can go as low as 12 months if you want.

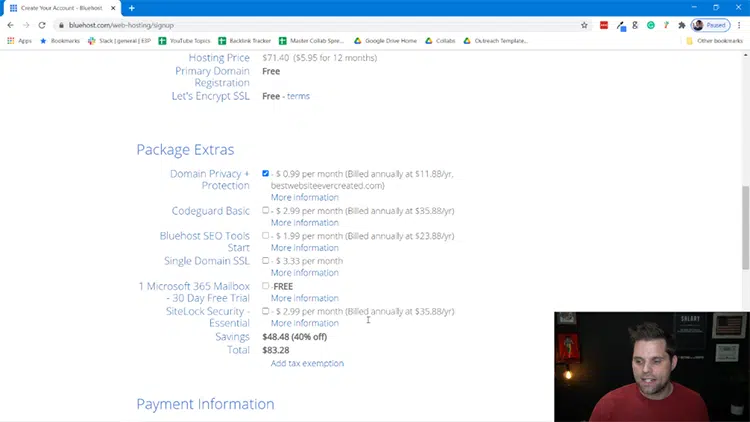
Step 6: Next, you’ll have to choose what “Package Extras” you want. You can scroll over “More Information” to understand each of these items, but here is my advice.
I would get the “Domain Privacy + Protection.” This makes it so that no one can tie your name to the domain name you create. The only other one worth considering is “Codeguard Basic.” The other two I wouldn’t personally get. But choose what is best for you.
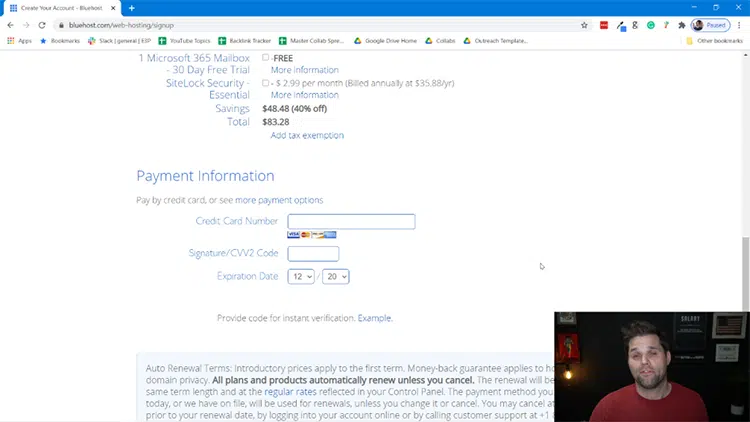
Step 7: The next step is Payment Information, which is self-explanatory.
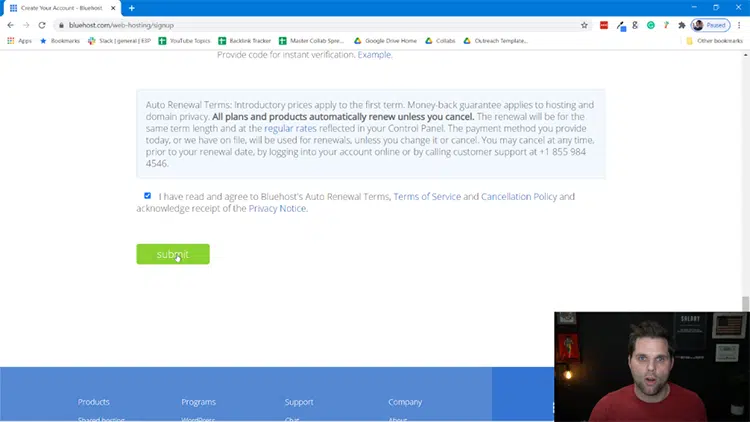
Step 8: The last step of signup is to confirm that you read and understand the Bluehost Terms of Service, Cancellation Policy, and Privacy Notice. Click the check button and then click “Submit.”
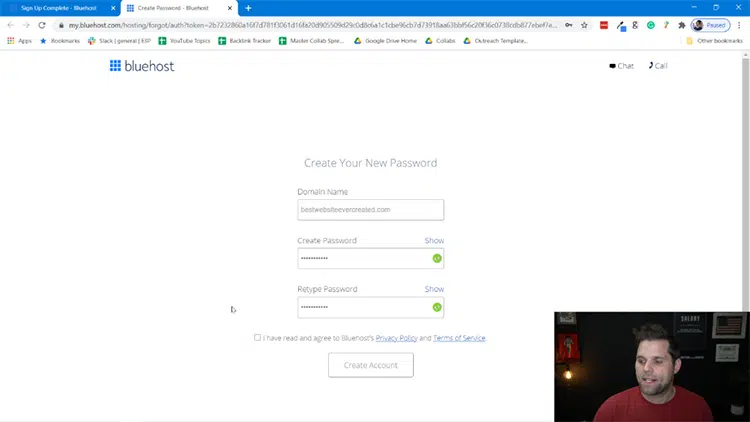
Step 9: Next, you’ll be prompted to create an account and password. You’ll use this information to log in to the Bluehost platform to manage your site and account info.
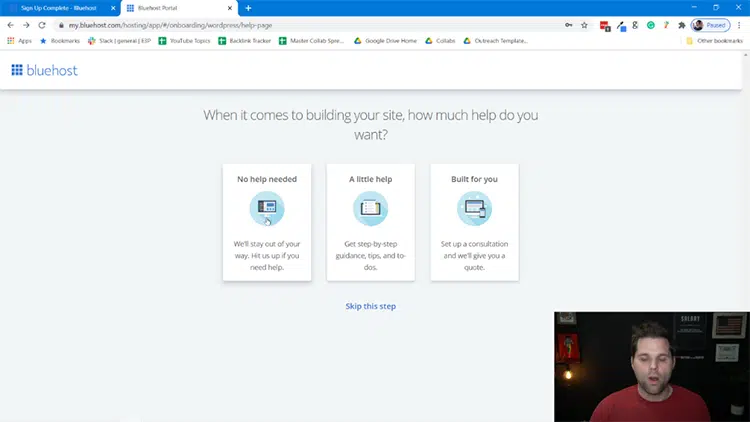
Step 10: At this point, Bluehost puts you through a short questionnaire to better understand your scenario. You can answer all of these questions or click “Skip this Step” at the bottom. If you’re a newbie, I advise you to answer the questions as it’ll help your onboarding experience.
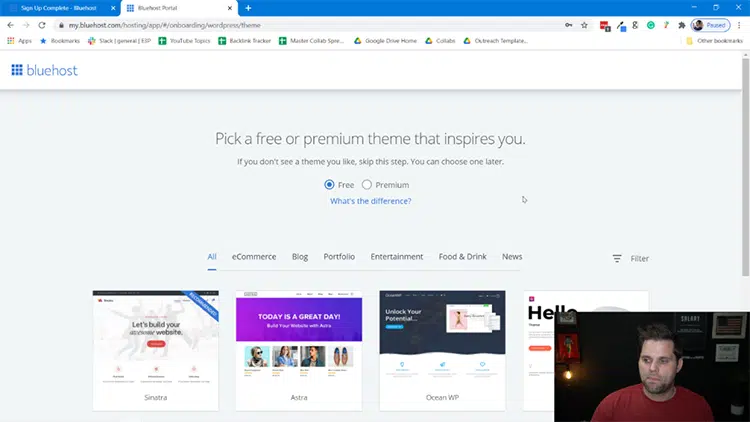
Step 11: After you’re done with that, you’ll be advised to choose a theme. For now, you can just choose to use a free theme. You can always replace the theme later if you’d like.
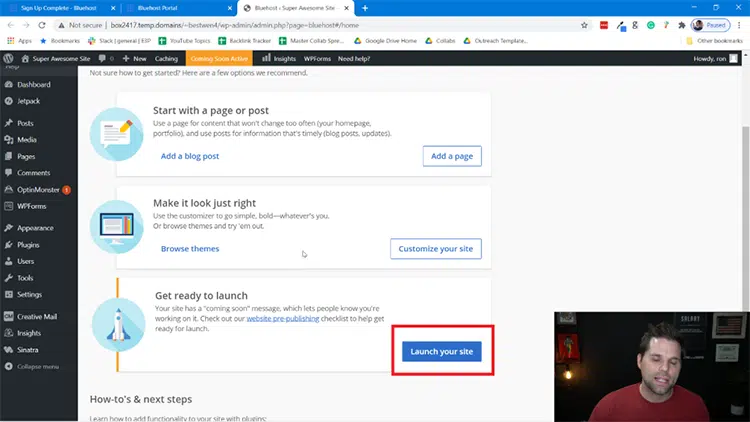
Step 12: You’ll be brought into the backend of WordPress in the admin panel. This is where you’ll manage your site from. You can add posts/pages as you see fit, but click on the blue button that says “Launch Your Site” when ready.
Step 13 (Final): Your blog is LIVE. Just go to a browser and type in your domain name. Once you do this, you’ll be able to access your website!
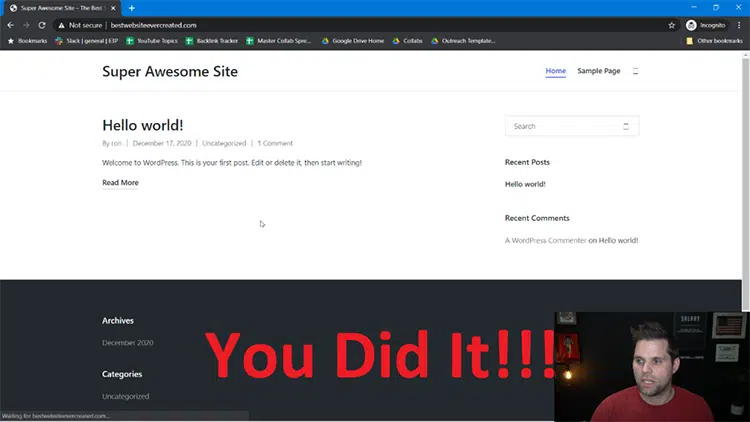
Congrats! You officially have a website.
If you’re wondering how to edit things on the website, all you have to do from here is go to your website URL with /wp-admin at the end in a browser and log in.
Example: http://mostawesomewebsiteever (dot) com/wp-admin
And don’t worry, we cover how to edit things more in the rest of this guide. So please continue reading.
6. Choose and Install a Theme For Your Craft Blog
Now, it’s time for the next step on how to start a craft blog – choosing and installing a WordPress theme.
The theme is a piece of software that dictates the way your content is displayed on your own website.
You need to pick a theme designed specifically for a craft blog to create a unique and professional-looking site. Craft blogs cannot be too general in their design because that will confuse the visitor, plus, it might be a bit overwhelming.
WordPress offers a lot of fantastic premium themes that you can choose from.
Keep the following factors in mind to ensure you choose the suitable theme for your blog:
What to Look for in a Good Theme
- Mobile Responsiveness
- Speed
- Easy Customization
- Beautiful Designs
- Prompt Tech Support
Luckily, all WordPress themes meet the criteria above.
They come with a ton of benefits.
Benefits of Premium WordPress Themes
- Responsive Design: Like many responsive website builders, quality WordPress themes look great on ANY device. This is very important. Usually, visitors will come on mobile devices, and here’s a split of the Android vs. iOS Market Share to help you understand what they use when they visit.
- Tech Support: This is perfect for anyone who has no technical expertise and is not tech-savvy
- Robust Security: Themes come with in-built security to fight off malicious code
- SEO-Friendly: WordPress websites tend to rank high in the search engines when you use and understand SEO
- User-Friendly: These themes are built to make it easy for complete beginners
- Unique Designs: You can build a unique website that doesn’t look like any other site online and even use family and child themes
Here are a few WordPress themes designed for craft blogs.
If none of them appeal to you, don’t worry. You can still search through theme marketplaces like ThemeForest, StudioPress, and Envato to find precisely what you’re looking for.
Craft Blog Theme Options for WordPress
Here are some options to consider:
1. Divi: If you’re looking to design a stunning website with ease, Divi from Elegant Themes stands out as arguably the best WordPress builder available today. Its intuitive visual drag-and-drop interface empowers users to craft amazing sites quickly. What sets Divi apart is its vast array of customizable modules, real-time design feedback, and a responsive editing feature that ensures your website looks impeccable on any device.
2. Astra: While Divi is renowned for its versatile design capabilities, the Astra theme offers a distinct set of advantages for those prioritizing speed, performance, and seamless integration. Astra stands out for its feather-light weight, ensuring that websites load at lightning-fast speeds—a critical factor for SEO and user experience. Moreover, Astra’s deep compatibility with major page builders, including Elementor and Beaver Builder, means that users aren’t restricted to a single design environment. The theme is also built with a focus on customization as well. You can read my Astra Theme Review is you want to learn more.
3. Themeforest.net: Themeforest has a significant amount of themes far beyond other platforms out there. There are over 48,000 total themes available on this platform, so you can find whatever you need.
Here are other examples of themes that are great for a Craft blog:
1. Food Craft – Clean & Modern PSD theme for Food Blog

This template is excellent for anyone who wants to create a “food craft” or “papercraft” blog. It’s clean and modern and makes it easy to display your beautiful works of art. You can easily change text, content, images, objects, and even the color palette.
2. Vixen – Responsive DIY Craft WordPress Blog

This theme comes ready with an Instagram feed plugin to make your social media sharing easier. It loads quickly and is optimized for SEO and readability. It’s easy to customize, and it can work great for all types of craft blogs.
3. Gabriela – Crafted Blog WordPress Theme

This easy-to-use WordPress theme is designed specifically for craft bloggers who want to share their thoughts about lifestyle, food, fashion, or any other topic that relies heavily on videos, images, galleries, links, and audio. This makes it perfect for all types of other blogs on crafts.
7. Create Essential Pages & Logo
Starting a craft blog also requires you to create certain pages that will contain more info about your blog and, ultimately, yourself.
We’ll start with the essential pages. These are the “About” page, “Contact” page, and “Privacy Policy” page. Craft blogs always have this information in a clear and easily-accessible way.
Here’s what you should include on each:
About Page
Include all the information you think your readers might want to know about you on this page.
Show them who’s behind the post they are reading.
Tell them your name, age, interests, and hobbies. Tell them where you stay, why you started this blog post, and your ultimate goals. Don’t be afraid to let your personality shine through.
You can even include an image of yourself on this page and post.
Contact Page
Your Contact page should include all the information visitors need to get in touch with you.
Ideally, there should also be a contact form in the post to make it easy and convenient for them to leave you messages.
You can also include a call-to-action and links to your social media channels and pages so visitors can connect with you on other platforms.
Privacy Policy Page
This is a vitally important page of your website.
There are websites online to get a privacy policy drafted for free. Check out my list of privacy policy generators for free and paid options to help.
Alternatively, you can hire a professional to draft this and other legal pages, such as the Disclaimer, Terms, and Conditions, etc.
Create a Logo
This is also an excellent time to create your craft blog logo.
There are many different ways you can do this, but I recommend using one of these logo makers to create a unique logo – even if you have no skills in technical stuff.
If you want high-resolution files, there’s a minimal charge to access them (as well as a few other things).
8. Begin Blogging
Now comes the fun part. Time to start craft blogging!
BUT, what exactly are you going to write about?
Here are a few craft blog ideas:
Create Step-by-Step Tutorials
Crafters love tutorials. They love to see what you’ve made, but they also want to know the step-by-step instructions on how they can make it.
So post and create tutorials on how to do awesome craft projects, and they will likely be a big hit with your audience.
Create Evergreen Articles
One surefire way to start your blogging journey and career off on the right foot is by creating evergreen articles for content that will stand the test of time.
For instance, you can start craft blogging and write and create reviews of supplies and equipment used in your craft. You can review anything you use for your craft and DIY projects or things you know your readers are interested in, including your craft business.
Either way that gives you A TON of ideas for things to review. This can be anything as simple as a crochet needle to a high-ticket course on glassblowing!
And remember, craft blogs aren’t just about written text.
You also need to provide other media formats like video and images – and lots of them!
In addition to evergreen articles, videos, YouTube videos, and image-heavy articles, you can also create news-type articles where you share the latest news in your industry or niche.
Important Note: You should have at least ten articles published before you start promoting anything on your new blog.
This ensures that the visitors you send to your blog site have enough content to keep them occupied and make them want to come back to read more articles.
9. Promoting Your Craft Blog
Promoting your craft blog comes down to a few practical strategies.
You don’t have to do it all simultaneously, but you can try one strategy, and once you have it running well, you can implement another and then another.
You will have a nice steady stream of traffic coming to your blog in time.
Tell Your Friends and Family About Your Own Website
This is the first thing you should do once your blog is live. Share it with your friends and family. Ask them to read your posts and give you feedback. Also, encourage them to share your blog and content links with their own networks of friends so you can reach even more people.
Leverage Social Media
Your target audience is on social media. It’s up to you to determine which platforms they hang out on. Generally, craft blogs tend to do well on Pinterest and Instagram. So make sure you share your content there to drive and direct people to your blog and create a steady stream of visitors to your new blog.
Join Relevant Groups and Forums of Craft Blogs
Find craft-focused Facebook Groups , Linkedin, Reddit, other online communities, and other bloggers. Once you join, start providing value, answering questions, commenting, and sharing helpful content from this blogging world. In other words, NETWORK with other bloggers with successful blogs!
In time, you will be able to share the links to your posts without seeming “spammy.” This will drive a lot of new traffic to your blog.
Guest Posts
Guest posting is a great tool and resource available to you as a new blogger. It allows you to connect with brand-new audiences that you otherwise may not have been able to reach.
All you have to do is find other popular blogs in your niche, pitch them your great idea for content, and then submit posts with a link back to your own blog so you can drive traffic to your posts.
Use Paid Social Ads
Social media ads are a great way to drive targeted traffic to your blog. You can set up a campaign for as little as $5 per day, and soon you’ll have a steady stream of visitors to each of your posts.
10. Start Making Money
Once you have a steady stream of visitors to your blog, it’s time to start thinking about how to monetize that traffic.
There are a lot of ways to make money with your craft blog.
For instance, you can start to earn money selling crafts on your blog. But the fact is, you don’t even have to sell physical items at all.
You can simply share your craft ideas and photos with your target audience, earn by selling products like e-books, craft pieces, a sample free email course, sell courses on craft, or sell principles, patterns, and other digital products.
Here are some other effective monetization methods to consider:
Display Ad Networks
This is one of the simplest ways to make money with your craft blog. You can join an ad network like Google AdSense, or one of its top alternatives where you can get paid for displaying ads on your blog and, in the future, generate money as your full-time income from ad revenue.
Affiliate Marketing
This is where you join affiliate networks and get paid to recommend certain products to your audience. Whenever a sale is made, the merchant pays a small commission. Making your affiliate relationships fruitful. Some of the more popular affiliate programs you can join as a craft blogger include Paper Mart, Fabricville, and Monotype. Most of the best craft blogs out there use affiliate marketing as a major part of generating income.
Selling Digital Products
You can sell everything from ebooks and gated content to online courses, audiobooks hosted on Audible, crafting kits, etc. The best part about this blog monetization method is that you only have to put in the work once, and you can SELL THE DIGITAL PRODUCT FOREVER!
Selling Physical Products From Your Own Blog
This is the original strategy to make extra money. Find an audience that is hungry for your crafts. Sell it to them. Everyone wins!
Create a Service
This monetization method is excellent because it allows you to monetize your skills to start making money from your blog from the first day. You can offer a service, such as teaching classes, one-on-one lessons from a crafting blog, or seminars (whether in person or online). This is an effective way to monetize your knowledge and skills.
Sponsored Posts
As your audience begins to grow in making crafts, brands will seek to create sponsored posts to market their products or services to your audience.
To monetize your successful blog, you can write sponsored posts and product reviews for brands in your niche (for a fee).
Just make sure that the topics you write about align with your target readers’ tastes to avoid alienating them.
If you enjoyed this blogging course and want to learn how to make even more money with your craft blog, then read this article. You won’t be disappointed.
I hope my guide on how to start a craft blog has helped you with the first steps and that the ways to make money with your craft blog I mentioned will give you a higher chance of success from the get-go. Good luck and remember not to give up; making successful craft blogs requires time and a lot of effort but the payoff is worth it in the end.