

DIY blogging is an interesting hobby and topic that can be educational for a lot of people.
There are thousands of DIY blogs online – and the numbers are growing every day. In short, there’s a specialty area for everyone in the DIY space.
Interestingly, a survey showed that 47% of DIY’ers purchased a product directly or started a project because they saw it on a blog or social media brand
If you are looking to start your own DIY blog, it’s clear to see that readers will never be in short supply. So read on to discover the simple 10-step process to learn how to start a DIY blog.
Editors Note
This guide is extremely DETAILED and explains everything you need to start a DIY blog. I’ve been at this blogging stuff for over 8 years and have built a business making $20,000 per month, so I have a lot of helpful advice for you newbies out there.
If you get stuck or need advice, I HIGHLY recommend that you get my 100% FREE blogging course by clicking here. If that doesn’t help please contact me directly and I’ll help you out for free.
How to Start a DIY Blog in 10 Steps:
If you just need someone to walk you through the process of setting up your blog quickly and easily, check out step 5.
Before we jump into the steps for starting a new blog, you might be wondering, “Why start a DIY blog?”
Well, there are many reasons, such as:
Share Your Ideas and Opinions: One of the most common reasons for starting a DIY blog is to let your voice be heard and share your knowledge, experience, interesting findings, etc. so you can educate others.
Show Off Your DIY Projects: Another reason to start a DIY blog is so you can show off your projects to family, friends, and other DIY lovers from across the world.
Earn Money: With the right blogging strategy, your DIY blog can provide you with a part-time OR full-time income.
Build a Creative Outlet: A DIY blog is a perfect way to express your creativity and let your talents shine.
Enhance Your Resume: You can use your blog as a way to build your resume and propel your career forward.
Improve Your Writing Skills: Blogging will also allow you to consistently improve your writing skills.
Get Noticed in the DIY Community: Yet another reason for starting a DIY blog is so you can be noticed by your peers in the DIY community.
As you can see, there are many reasons why you might want to begin a blog in the DIY space.
But, regardless of what your goals are with your new blog, the process for starting is the same.
1. Decide on Your Focus for the DIY Blog
The first step in building a successful DIY blog involves deciding on the focus or direction of your blog.
This is important because simply having “DIY” as the theme of your blog will make it hard for you to build an audience of engaged readers.
You need to narrow down your focus toward a specific topic or category.
There are many different ways you can position your blog, and below I’ve listed some of them to help make your decision-making process easier.
- Showing tutorials on how to create DIY projects
- Reviewing other DIY creators
- DIY Fashion pieces and projects
- Trying DIY Projects yourself and documenting them
- Reviewing DIY products out there and choosing the best ones
If you’re finding it a bit hard to make a choice, simply look at some of your favorite DIY blogs and determine the ones that you find most interesting and appealing.
This might help you come to a decision about the focus or direction of your own blog.
2. Choose Your DIY Niche
Your next step is to establish your DIY niche.
“DIY” is an extensive topic, which means you may be overwhelmed by the sheer number of options available to you.
Your niche is that little corner of the market that you’re most knowledgeable (or experienced, talented, passionate, etc.) about.
It’s an area where you can establish yourself as an authority on the subject.
It’s necessary to pick a niche because trying to take on the entire DIY topic all at once will leave you outmatched by the big websites that are already established and make it extremely hard for you to build an audience.
There are many different types of DIY you can focus on for your blog.
The trick here is to pick a DIY blog niche that is broad enough that you have a large audience and plenty of topics to write about, but not so broad that it’s hard to differentiate yourself.
Here are some DIY niche examples to get you started:
1. DIY Furniture
Example: Pretty Handy Girl

2. DIY Home Decor
Example: Your House Needs This

3. DIY Holiday Decor
Example: The Budget Decorator

4. DIY Landscaping
Example: Handyman Tips

5. DIY Painting
Example: It All Started With Paint

6. DIY Crafts
Example: A Beautiful Mess
I’ve created a more in-depth guide for craft blogs as well.

7. DIY Sewing
Example: She Sews

8. DIY Electronics
Example: Dr. Monks DIY Electronics Blog

9. DIY Home Improvements
Example: The Created Home

10. DIY Bathroom Renovations
Example: Home Repair Tutor

Keep in mind, this list isn’t all-inclusive.
Even something as simple as a DIY food recipe blog works too, or if DIY is a big part of your life, you could roll it into a full-fledged lifestyle blog or mom blog with DIY as a component of that. Most DIY blogs online have a multitude of categories, and it’s fine if you want to diversify.
So, you can choose one niche OR a variety of niches.
But, the clearer you are about the type of content you want to create for your new blog, the easier it will be for you to focus and build a unique DIY blog that stands out from the rest.
Remember, if you try to create content for everyone, you will likely end up reaching no one. It’s always best if you choose an area where you have previous knowledge or experience, or at least a very keen interest. You need a firm understanding of the topic and how things work if you’re going to build a successful blog.
3. Choose Your Blogging Platform
Once you’ve established your niche, it’s time to select your blogging platform.
Although there are tons of different blogging platforms to choose from, not all of them are created equal.
For instance, you will find that there are many free or “hosted” blogging platforms like Blogger, Wix, and Square space.
Although it may be enticing to opt for one of these, the fact is they actually cost you more than premium blogging platforms in the long run.
Here’s why:
- Free platforms limit your ability to make money through product sales and ads
- There are certain website restrictions that may limit your growth
- Free sites are also hard to customize which means your blog will look the same as a thousand others
- You don’t actually own your own content and your site may be taken down without notice
- The SEO work you do benefits the host’s platform and not your own website
Furthermore, with a free blogging platform, you can’t have a custom domain name, which means that it’ll be hard for people to take you or your blog seriously.
So you can see why it’s not recommended for you to use free blogging platforms.
So what should you use instead?
Definitely choose self-hosted vs. free alternatives. I recommend using WordPress.
It’s popular, easy to use, and doesn’t require a lot of technical know-how to get started.
Here are some of the benefits of using premium WordPress as your blogging platform:
- WordPress is free to download and use
- WordPress allows you to monetize your DIY blog in a lot of ways
- WordPress offers stellar customer support
- There are tons of unique and affordable themes for customizing your website
- There are thousands of plug-ins (free and paid) to extend the functionality of your website
The bottom line is that WordPress offers you a solid foundation on which to build your DIY blog so you can ensure its future growth, success, and profitability.
As you can see, there are many reasons why you should choose WordPress
4. Decide on Your Domain Name
Step 4 of this guide on how to start a DIY blog involves choosing your domain name.
A domain name is simply what you are going to call your new DIY blog.
You need a great name that is short, memorable, and easy for your audience to type into their browsers.
Although this is a crucial part of the overall process of starting your new blog, choosing a blog name shouldn’t take you more than an hour or two to complete.
Below are the 10 steps to choosing a great domain name:
1. Go with “.com“: This is one of the most common and easily recognizable domain extensions. It makes your website easier for your audience to recall. That’s why it’s a good idea to choose a popular top-level domain like .com, as opposed to .DIY.
2. Choose a Broad Name: You want a name that allows you to expand in the future and not one that limits your content creation efforts. For instance, choosing a name like “DIY Holiday Decor” would give you more freedom to grow your blog than a name like “DIY Easter Decor”.
3. Choose a Short Name: Your name should be short and to the point. Try to keep it to just two or three words – four the most. And avoid using complicated or unusual words in your domain name.
4. Use Alliteration: Alliteration is the use of two or more words that sound similar or begin with the same letter, like “DIY Divas”, or “Courtney’s Crafts”. This makes your blog name much easier for your audience to remember.
5. Be Creative: If the name you want for your DIY blog is already taken, try using synonyms, unique words, or even foreign words as these are more likely to still be available. For example, if you wanted a name like “Crafty Guy”, you might opt for something like “Crafty Dude”, instead.
6. Add Extra words: Add extra words like “the”, “club”, “hub”, and so on if you’re still unable to get the blog name you want. Using the example above, if you wanted the name “Crafty Guy”, but it was already taken, you might call your new blog “The Crafty Guy”, instead.
7. Think of a Concept: When brainstorming names for your new blog, it can help to attach a concept to the name. For instance, think about different branding ideas for your new blog. Where do you want to take it in the future? Answering this question will make it easier for you to come up with a relevant name for your blog.
8. Use Domain Name Generators: Sites like Instant Domain Search and Lean Domain Search can help you come up with some inspiring names for your blog if you are still stuck. Simply type in some keywords, and the tool will spit out dozens of name ideas.
9. Don’t Buy an Expensive Name: When you are just starting out, it’s a good idea to choose a standard domain name. Later, when your blog starts making a good income, you can then consider buying any domain name you want.
10. Don’t Get Stuck Here: This should be a reasonably fast decision, and yet it’s where a lot of beginners get stuck. They spend so much time trying to come up with the perfect name for their blog that they never get anything else done.
The important thing is to TAKE ACTION on what you’ve learned.
So, put aside a couple of hours, and get this done. Pick a name that you are happy with and then move on to the next step.
Examples of Popular DIY Blog Names (and why the names make sense)
Below 5 examples of DIY blogs already out there, as well as an explanation of why the names make sense.
1. Vintage Revivals: This blog name is short and descriptive. It makes it clear to its audience of old home enthusiasts exactly what they’re in for.
2. Remodelaholic: The name of this remodeling-focused blog is short, unique, descriptive, and memorable.
3. Garden Therapy: This name is simple, easy to remember, and designed to inspire readers to get out, get dirty, and fall in love with the garden.
4. Oh Happy Day: This name makes it clear that this party-themed DIY blog is focused on happy events – and it’s short, sweet, and very easy to remember.
5. Mod Podge Rocks: The name of this crafts blog uses alliteration to create a punchy name that’s easy to remember.
5. Buy Your Domain Name and Hosting
Now that your blog is named, you need to buy a domain name and choose a website hosting platform.
Your domain name is the web address that your audience types into their browsers to get to your blog.
It can be different from your blog name, but it’s always best to use the same name in order to avoid confusing your readers.
The domain hosting can be likened to the real estate online on which your website or blog resides.
Your host provider keeps all your blog images, files, etc. safe on their servers and makes sure your website is always available to your readers online.
These are both services that you need to pay for.
If you have never built a website before, this part may seem a little daunting. But don’t worry, I am going to walk you through the entire process of buying a domain name and hosting.
Below is a step-by-step tutorial where I walk you through the whole process of buying your domain name and hosting.
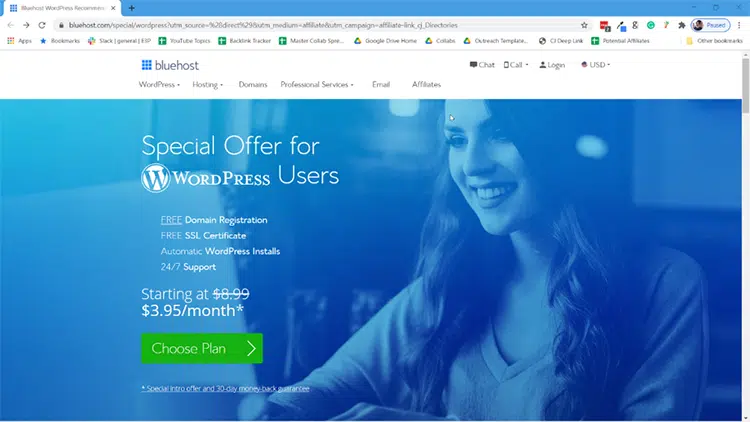
Step 1: If you haven’t yet, click on this link and you’ll be brought to the WordPress Hosting page that you see below.
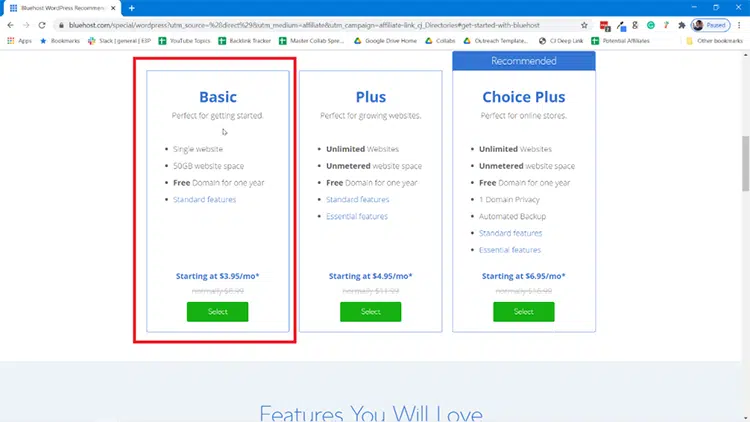
Step 2: Next, you’ll be brought to the hosting plan page. You could choose to get a “Plus” or “Choice Plus” plan, but honestly, that’s not a requirement.
The Startup plan is the cheapest at $2.95/month through my link vs. the normal $8.99/month.
This plan has everything you need including 50GB of webspace (plenty of room for your files), a free domain for a year, plus other standard features like a free SSL and a secure WordPress install. Feel free to browse a bit to decide the right plan for you, but rest assured that Basic will work just fine if you want to minimize your investment.
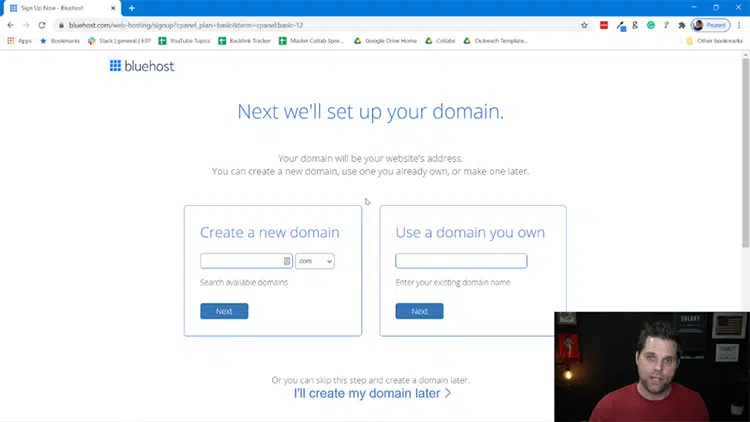
Step 3: After clicking into the plan, you’ll be brought to the next page where you will type-in your new domain, or you can just choose “I’ll create my domain later” if you haven’t decided on one yet. The domain is the URL people will type into a browser to view your website in the future.
Step 4: Once you submit, the next page will ask for all of your information. That will start with your account information, which is self-explanatory.
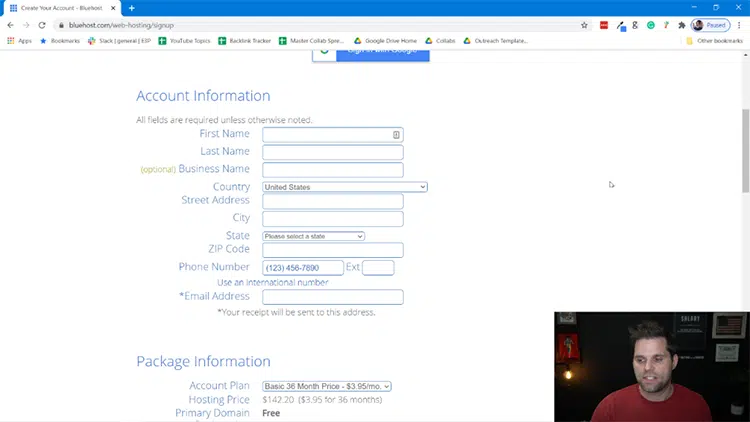
Step 5: Next, you’ll have to input your Package Information. This is to choose how long you want the plan to go for. My advice is that you choose 24 months to get the discount and save some money, but you can go as low 12 months if you want.

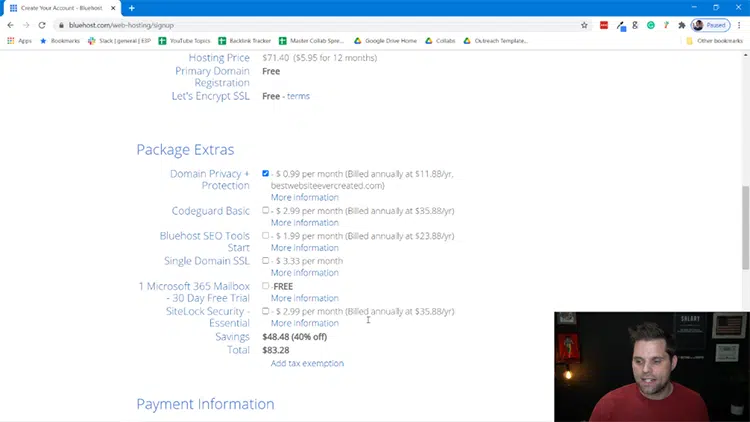
Step 6: Next you’ll have to choose what “Package Extras” you want. You can scroll over “More Information” to understand what each of these items are, but here is my own advice.
I would get the “Domain Privacy + Protection”, this makes it so that no one can tie your name to the domain name you create. To me, the only other one worth considering is “Codeguard Basic”. The other two I wouldn’t personally get. But choose what is best for you.
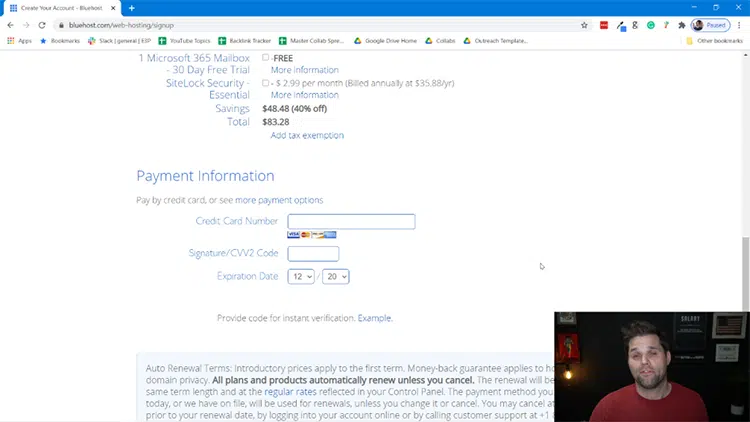
Step 7: The next step is Payment Information, which is self-explanatory.
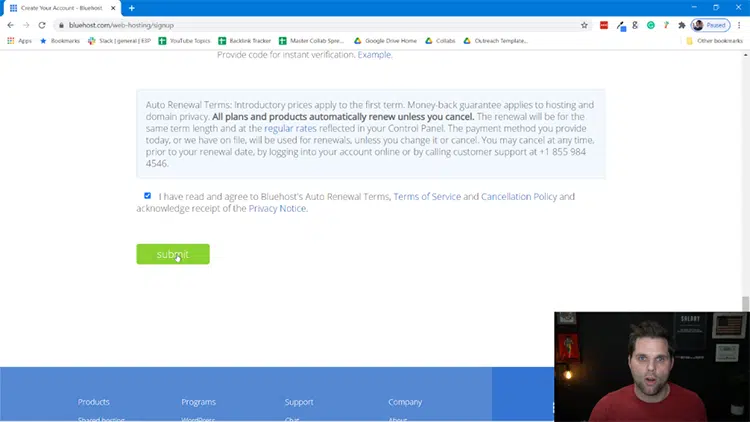
Step 8: And the last step of signup is to confirm that you read and understand the Bluehost Terms of Service, Cancellation Policy, and Privacy Notice. Click the check button and then click “Submit”.
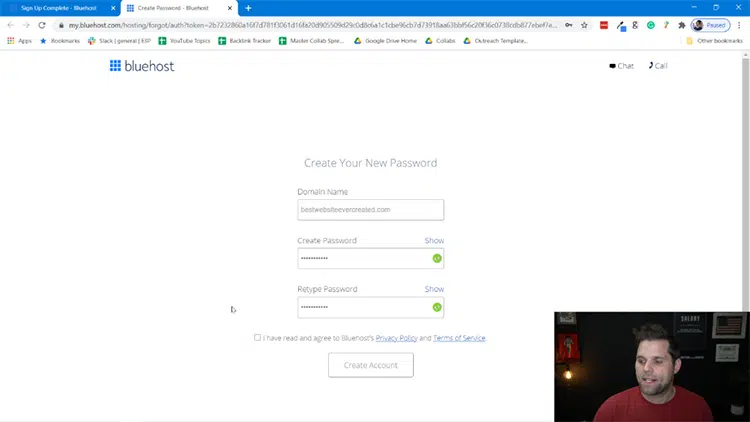
Step 9: Next you’ll be prompted to create an account and password. This is the information that you’ll use to login to the Bluehost platform to manage your site and account info.
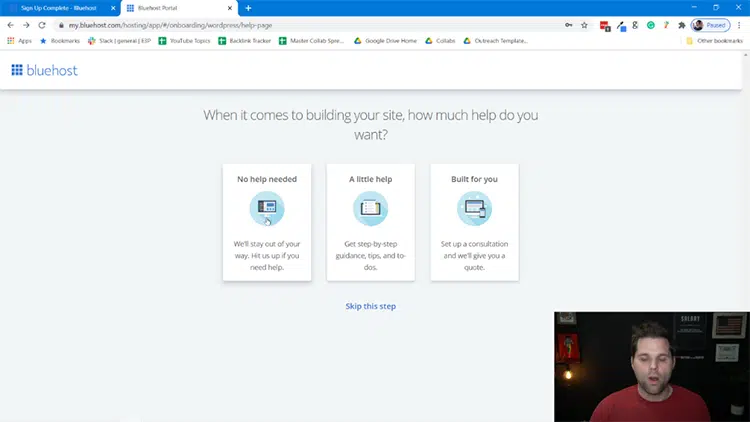
Step 10: At this point Bluehost puts you through a short questionnaire to better understand your scenario. You can answer all of these questions, or click “Skip this Step” on the bottom. If you’re a newbie, I advise you to answer the questions as it’ll help your onboarding experience.
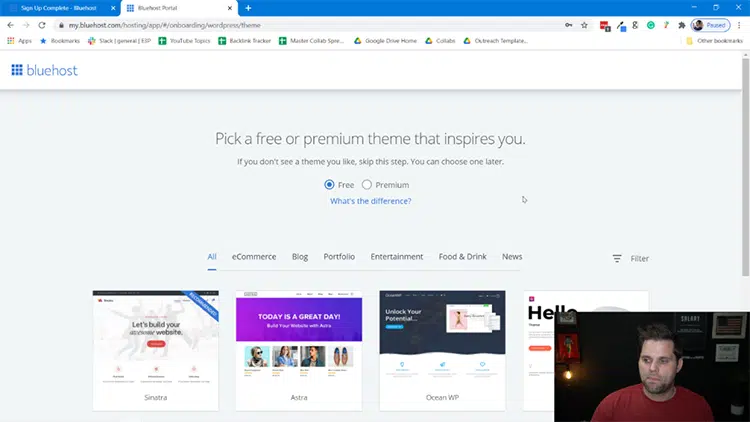
Step 11: After you’re done with that you’ll be advised to choose a theme. For now, you can just choose to use a free theme. You can always replace the theme later if you’d like.
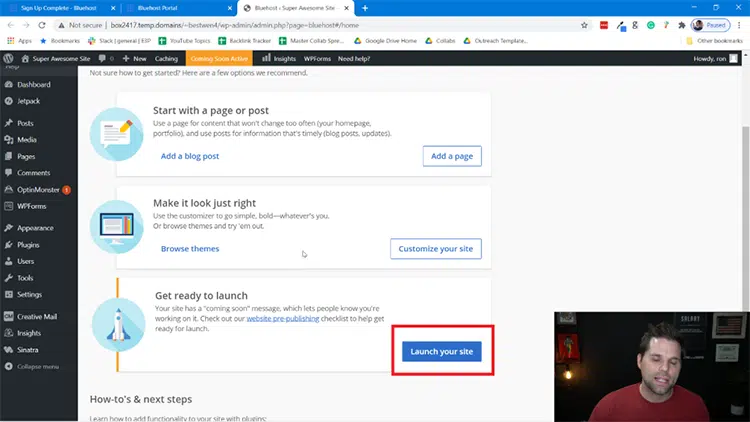
Step 12: From there, you’ll be brought into the backend of WordPress in the admin panel. This is where you’ll manage your site from. You can add posts/pages as you see fit, but when you’re ready click on the blue button that says “Launch Your Site”.
Step 13 (Final): Your blog is LIVE. Just go to a browser and type in your domain name. Once you do this, you’ll be able to access your website!
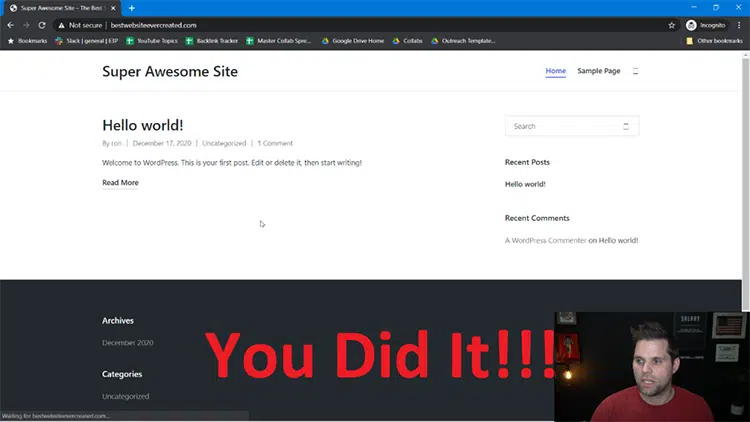
Congrats! You officially have a website.
If you’re wondering how to edit things on the website, all you have to do from here is go to your website URL with /wp-admin at the end in a browser and login.
Example: http://mostawesomewebsiteever (dot) com/wp-admin
And don’t worry, we cover how to edit things more in the rest of this guide as well. So please continue reading.
6. Choose and Install a Theme For Your DIY Blog
A theme is like your home’s interior decor.
It’s a piece of software that determines how your website looks, its layout, and design.
WordPress offers a ton of themes that you can use to enhance your website’s appearance and functionality.
You want to choose a unique theme that is specifically designed for DIY blogs.
As with most other tools online, there are free themes and paid themes that you can choose from.
And while the idea of a free theme may be appealing to you, it’s important to understand that free themes come with a wide range of drawbacks.
For instance:
- Free themes come with limited support options
- They lack the features and functionality required for a successful blog
- Customization may require coding knowledge
- All theme designs are similar so your blog won’t be unique
- Sometimes free themes come bundled up with malicious software
You need to choose a high-quality, premium WordPress theme that will allow you to build a unique, professional-looking DIY blog.
Remember, people make snap decisions about whether or not to stay on your blog based on the first couple of seconds after they land on your site.
Your design and layout play a MAJOR role in helping you to ensure that you keep visitors engaged on your blog.
That’s why it’s crucial for you to choose a good WordPress theme.
Listed below are the factors to consider when choosing a theme:
- Speed
- Mobile Responsiveness
- Beautiful Designs
- Reliable Support
- Customization Features
- Well-established Brand
- Good Reviews and Ratings
DIY Blog Theme Options for WordPress
1. Divi: If you’re looking to design a stunning website with ease, Divi from Elegant Themes stands out as arguably the best WordPress builder available today. Its intuitive visual drag-and-drop interface empowers users to craft amazing sites quickly. What sets Divi apart is its vast array of customizable modules, real-time design feedback, and a responsive editing feature that ensures your website looks impeccable on any device.
2. Astra: While Divi is renowned for its versatile design capabilities, the Astra theme offers a distinct set of advantages for those prioritizing speed, performance, and seamless integration. Astra stands out for its feather-light weight, ensuring that websites load at lightning-fast speeds—a critical factor for SEO and user experience. Moreover, Astra’s deep compatibility with major page builders, including Elementor and Beaver Builder, means that users aren’t restricted to a single design environment. The theme is also built with a focus on customization as well. You can read my Astra Theme Review is you want to learn more.
3. Themeforest.net: Themeforest has a significant amount of themes far beyond other platforms out there. There are over 48,000 total themes available on this platform, so you can find whatever you need.
Here are a few examples of themes that are great for a DIY blog:
1. Vixen – Responsive DIY Craft WordPress Blog

This theme is super fast, responsive, and SEO optimized.
It has beautiful details that will allow you to bring out your creativity, regardless of the type of DIY blog you want to create.
Its clean and minimal design is made for readability, which will help you keep readers on your pages for longer.
2. All4Home

Admittedly, this theme isn’t specifically for DIY blogs, but I really think it would do well as well. It’s built to show your content as the focus and has a nice Ecommerce component that could come in handy.
3. Karis – Personal Blog & Magazine WordPress Theme

This is a clean, modern WordPress theme you can use to create a powerful, responsive DIY blog.
It comes with a lot of beautiful templates, each of which is fully customizable so you can set your blog apart from the rest with just a few clicks of the mouse.
4. Catarina – Personal Blog & Magazine WordPress Theme

This theme boasts a “mobile-first” design, which means that it will provide a beautiful experience for users on all devices.
It comes with multiple featured area layouts, different blog listing layouts, and a magazine homepage – all professionally designed and optimized so you can hit the ground blogging.
5. Handy – Handmade Shop WordPress WooCommerce Theme

This theme is great for DIYers who sell their goods online.
It helps you automate your sales process and include all the features necessary to build a professional eCommerce hub.
With it, you’ll be able to take care of everything – from your marketing and sales efforts, to engaging with customers, and so on.
7. Create Essential Pages & Logo
Now that your blog is all set up, it’s time to create a logo and essential pages.
The process for adding new pages to your blog is simple. Go to your WordPress dashboard, click on “Pages > Add New” and enter the name of your new page.
After you’ve added the contents, simply click “Publish”, and your page will be live.
Your blog’s essential pages should include the following:
About Page: This page is designed to give your readers all the information they need to know about you.
You can update this page over time, but in the beginning, make sure you give them all the basics, such as who you are, and why you’re starting a DIY blog.
Explain what you hope to achieve with your blog, and so on. You can include an image of yourself on this page.
Contact Page: On this page, provide your readers with essential contact information, such as your email, phone number, address, and any other pertinent information required by those who might want to get in touch with you.
You can also include your social media information on this page with a call to action for readers to connect with you.
Privacy Policy: Privacy laws require that your blog includes a privacy policy to protect your readers’ privacy rights.
If you’re not sure how to structure yours, there are free resources online that can help you create this page for your blog. Check out my list of privacy policy generators for free and paid options to help.
Create a Logo: Your DIY blog also needs a logo to brand it and make it easier for your audience to recognize your blog.
There are tons of logo creators online, but I am a big fan of these online logo creators. Simply sign up on the platform that you prefer and you can create a free logo for your new blog.
8. Begin Blogging
When most people think about a blog, they have an idea of tons of written content on a page.
Although you will need to have lots of written articles, you also need to mix them up with other different formats.
There are several effective methods you can choose to present your material on your new DIY blog.
These include:
- How-to articles
- List posts
- Video tutorials
- News-type articles
- Image-heavy content
- Podcasts
- Slideshows
You can also mix-and-match multiple formats on one post.
For instance, you might have the text and include images or infographics, as well as a video embedded on the page.
It’s a good idea to start with a few evergreen articles or “pillar” posts for your blog.
This can be anything such as how-to articles for various common projects within your niche.
Make them long-form and in-depth, making sure that you dive deep into the topic so you answer as many of your audience’s questions as possible.
Use formatting best practices to ensure that you maintain your audience’s attention and boost engagement for your blog.
Once you have a few of these types of posts, you can then start to branch out into the various subtopics of your niche to create smaller posts around each category.
Important Note: Make sure you have at least 10 blog posts written and published before you start promoting your new DIY blog. This is to ensure that your visitors to your blog find enough content to keep them interested and ensure that they come back to read more.
9. Promoting Your DIY Blog
Once everything is in place, it’s time to start promoting a DIY blog so you can generate a flow of traffic to your posts.
Here are a few of the most effective ways to achieve that:
Tell Your Friends and Family: As soon as your blog is live, share it with your family and friends and ask them to check it out. Encourage them to give you feedback that can allow you to further improve your blog. You also need to ask them to share your blog with their own networks to give you even more exposure.
Social Media: If you are already on social media, you can share the link to your blog on all your profiles. If not, you can create new profiles for your blog and start sharing the content you publish.
Relevant Facebook Groups: While on the subject of social media, it’s also a good idea to find DIYers where they hang out. Join relevant groups, and engage with them, jump into conversations, and leave helpful comments. In time, you can start directing people to your blog without seeming “spammy”.
DIY Forums: Another great way to promote your new blog is to join DIY forums and other online communities (like Reddit.com/r/DIY/) where you can engage with relevant audiences, build organic relationships, and direct people to your new blog.
Guest Posting: This is one of the best ways to promote your DIY blog because it puts your content in front of brand-new audiences that you otherwise may not have been able to reach.
Simply find popular DIY blogs in your niche that accept guest posts, and pitch them your blog post ideas. Once accepted, you can write posts on their blog and link back to your own site as a way to drive new traffic to your content.
10. Start Making Money
And now comes the fun part. Time to make some money!
As soon as you start seeing some traffic to your blog, you can begin monetizing that traffic and start earning an income from all your hard work.
Here are a few ways you can begin generating profit from your blog:
Affiliate Marketing: Whatever tools, resources, equipment, or supplies you write about or use in your projects, you can recommend to your audience. And, for every purchase made, you will be paid a small affiliate commission.
Over time, and as your audience grows, this amount will also grow into a healthy source of passive income.
To get started as an affiliate marketer, all you have to do is sign up for affiliate marketing programs like Amazon Associates and you will be given a link which you can then share within your posts.
Display Ad Networks: This is one of the simplest ways for beginners to generate income online. You can join display ad networks like Google AdSense or one of these popular Adsense alternatives and start turning your traffic into dollars.
Google will display ads on your website that are relevant to your audience, and every time an ad is viewed or clicked, you will be paid a small amount. As with affiliate marketing, this adds up over time and grows as your blog grows.
Consulting: Creating a service such as consulting is a great way to monetize your blog from the very beginning – and without the risk that comes with having to invest tons of money into a product.
If you already have the skills and knowledge that your audience is willing to pay for, simply sell your services on your blog as a DIY expert and charge a premium for your time.
Sell Information Products: This is one of the most effective ways to monetize your blog. You only need to create an info product once, and you can sell it for years to come. This includes things such as:
- Project blueprints
- Project videos
- Gated courses
- Ebooks
- Online courses, etc.
Sell Your Own DIY Kits: You can create your own DIY kits that are relevant to your audience and sell them on your blog or other eCommerce marketplaces.
Although this requires an initial investment of time and money, once created, you’ll quickly begin to see a return on investment – as long as you’re offering a high-quality product.
Sponsored Posts and Product Reviews: Yet another great way to generate profit from your DIY blog is to write reviews or posts for other websites and businesses – for a fee.
As long as the topics are aligned with your niche, everyone will benefit. The business gets added exposure, you get paid, and your audience benefits from a great post.
I hope my guide on how to start a DIY blog will come in handy for beginning your DIY blogger career. Good luck!