

Knowledge has powered humanity for thousands of years, driving innovation to make our lives easier and better. There’s no nobler act than sharing the knowledge you possess with others, encouraging them to achieve their dreams and aspirations.
I‘ve been a teacher myself since 2010 and have successfully used blogs as an aide in many of the courses that I’ve taught and it’s been an absolute pleasure to add my own personal touch in the classroom.
That said, with all of my experience, I decided it would be a great idea to explain to others exactly how to start a teacher blog themselves.
Editors Note
This guide is extremely DETAILED and explains everything you need to start a Teacher blog. I’ve been at this blogging stuff for over 8 years and have built a business making $20,000 per month, so I have a lot of helpful advice for you newbies out there.
If you get stuck or need advice, I HIGHLY recommend that you get my 100% FREE blogging course by clicking here. If that doesn’t help please contact me directly and I’ll help you out for free.
How to Start a Teacher Blog in 10 Steps:
If you just need someone to walk you through the process of setting up your blog quickly and easily, check out step 5.
There are over 3.7 million teachers in the US, and if you are one of the country’s teaching professionals, then starting a teacher blog is a great way to share your best thoughts and ideas on teaching.
As a school teacher, a blog will allow you to reach a large audience or help you facilitate a classroom. A teacher blog is also a great way to show others your teaching point of view and create a community of friends and followers who love teaching and teaching information.
Why Would a Teacher Start a Blog?
Before I begin showing you how to start a teacher blog, I’d like to point out a couple of reasons for starting teacher blogs. This is what most people feel influenced by but don’t feel like you have to be limited to just the ones I mention – after all, everyone has their own reasons for doing something.
Let Your Voice Be Heard: As an educator, you have your own point of view and a unique approach to teaching. Starting a blog gives you a platform where you can share these thoughts, ideas, and knowledge with an audience of students, parents, and other like-minded individuals.
Improve Your Writing Skills: As you research and read other blogs in your niche, and regularly create content to publish on your blog, your writing skills will continue to improve.
Make Money: You can make a good income from your teacher blog. Starting a blog is a low barrier and low-risk endeavor. The larger you grow your following online, the more money you will be able to make using a variety of blog monetization methods (some of which we’ll look at below).
Connect with other Teachers: Your teacher blog will act as an effective tool to help you find and connect with others like you so you can build a community of engaged followers.
Show Professional Expertise: A blog is a perfect platform to showcase your professional expertise. With the right blog promotion methods, you will gain exposure and connect with a massive audience online.
Assist in Teaching Responsibilities with Students: With a blog, you can easily make teaching materials and share that knowledge with your students in a convenient way. Students can continue to learn even when they’re not in class.
Give Feedback to Students or Parents: A blog makes it easy to give feedback to students and parents without having to invest more of your time. You can post the feedback on your blog and students or parents can check it out at their convenience.
These are just a few of the many reasons why teaching professionals should start a teacher blog. Now, let’s dive into the step-by-step process to start building your blog right now.
1. Decide the Focus of Your Teacher Blog
Now, you might be wondering, ‘How can a teacher create and use a blog for teaching?’.
Whether you want to brainstorm ideas with others, share worksheets, establish a pedagogy, or connect with others in your profession – it’s all possible. There are teacher blogs of all kinds and for all purposes.
But, you can’t be everything to everyone, so the first thing you need to do is to decide on the focus or direction of your blog.
To give you inspiration on choosing your focus, below I’ve listed a few of the different ways you can position your teacher blog.
- Share Lesson Plans: You can use your teacher blog as a platform to share lesson plans.
- Enhanced Teaching Methods: Your blog can be focused on how teachers can better teach students, or you can criticize teaching methods.
- Help Students and Parents: You can use your educational blog as a tool to assist parents in understanding how students are doing or the lessons they’re learning.
- Teaching POV: Another way to position your blog is to focus on sharing your point of view on what it’s like to be a teacher.
- Teaching Career Advice: Educational blogs for teachers sharing knowledge and advice with those who are considering joining the teaching profession.
- Teaching Style and Strategies: Alternatively, you can use your blog as a vehicle to share effective teaching strategies for the classroom.
- Pedagogy: You can also use pedagogy as the focus for your blog, similar to the blog Cult of Pedagogy.
- Self-Help Work: Your blog can be focused on providing self-help work tips and resources for students and other teachers.
2. Choose Your Teacher Niche
Now that you have a direction for your blog, it’s time to choose a niche. Teaching is a rewarding profession, but it’s also vast, with many different aspects to it. Instead of creating a generic blog on “teaching”, you want to choose a niche within that broad industry.
And niche is simply a subset of the market that you will focus on. It helps if you are knowledgeable, skilled, or experienced in the particular niche that you choose.
Listed below are the different types of niches you can focus on with your new blog.
- Choose a Subject like Math, Science, Reading, Writing, English, etc.
- Choose a Grade
- Substitute Teaching
- Secondary School Resources
- Christian education and lessons (If you’re in a Christian school)
- Co-Teaching
- Multi-Grade/Multi-Age Classrooms
- Classroom Management
- Homeschooling
- Blogging about various books in the curriculum
- Grammar
- Vocabulary for a Particular Use
- Videos on Pronunciation
- Listening Exercises
- Higher Education
- Navigating High School
- Lesson plans and crafting activities
You get the idea. There are tons of niches you can choose from, but it’s important to note that you only need one to begin – you can always expand later. This is also true for educational blogs for teachers.
You can also merge two or more niches to create a unique subset of the market where you can provide immense value to an audience with specific demands and preferences.
Just keep in mind that your niche should not be too broad, as this will make it hard to grow an engaged audience. Conversely, the niche you choose shouldn’t be too narrow as this will limit your ability to grow your blog in the future.
Your niche should be broad enough that it applies to a wide range of educators, but also narrow enough that it’s not just a “teacher blog about teaching”.
The more general your blog topics are, the less likely it is that you will be able to rank number one in the search engines.
If you chose a topic like “teacher resources” you are unlikely to ever rank for it because you will be competing against big companies with massive marketing budgets and armies of editorial staff all working to secure those slots.
But, it’s relatively easy to rank at the top for a narrower niche. And, you will also be considered an expert authority in that area.
Also, keep in mind that although your niche will guide your content creation strategy, you can still write on other topics. This is how famous and successful teacher blogs work.
An example is the blog “The Cornerstone for Teachers”. The blog’s niche is “Classroom Management”, but they still have sections of pages where they focus on “Edupreneurs“. The topic works because they are still approaching the Edupreneurs topic from a management point of view.
The best blogs for teachers understand that variety is the key to success.
3. Choose Your Blogging Platform
At this point, you may be thinking that starting a teacher blog sounds great. But, maybe you’re worried that you are not as tech-savvy as you would like to be.
If that’s the case, I have good news for you. Throughout this guide on how to start a teacher blog, I will outline the technical process of creating a blog in such a way that even a 6-year-old could do it with very little instruction.
The first thing you need to do is choose your blogging platform. This is a piece of software that will allow your blog to be visible online.
There are many blogging platforms to choose from. Some are free, and others cost money. Free platforms include Blogger, SquareSpace, and Wix. There are also other free platforms designed specifically for teachers, like Tes.com or TeachersPayTeachers.com. But, before you reach for these free options, it’s important to know that they come with some drawbacks.
Drawbacks of Using Free Blogging Platforms
- Poor Customization Abilities: With a free blogging platform, you don’t have the ability to fully customize it to match your style and preferences.
- Unprofessional Look: Having a domain name like “MyTeacherBlog.Squarespace.com” looks a lot less professional than having your own domain, which would look like this: “MyTeacherBlog.com”.
- Limited Capabilities: A lot of features that you will find in professional websites aren’t available on free blogging platforms, such as e-commerce, email delivery services, custom themes, etc.
- Low Monetization Potential: Due to the limited capabilities of free blogs, it makes it hard for you to implement blog monetization strategies.
- Lack of Control: You don’t have control over your blog or content and they can delete your account without warning.
- Switching is a Hassle: Making the move from a free blogging platform to a self-hosted blog can be a tedious and time-consuming task.
The bottom line is that free blogging services simply use your content to make their own website more popular. All your hard work for content creation and SEO (search engine optimization) goes toward increasing the host’s bottom line.
Also, websites like Tes.com and TeachersPayTeachers.com take commissions of up to 60% and charge additional taxes of around 15% on any sales of your digital products. That means if (for instance) you create an ebook that sells for $10, you’ll only receive about $4 after all the charges.
On the other hand, if you had the same product for sale on your site, you’d get to keep all your money – all the while creating your own brand.
So, it’s clear to see why it’s a bad idea to use free blogging platforms.
If you want your work to reward you more, then you need to avoid hosted platforms and create your own blog.
So what should you use? I recommend that you use WordPress for your teacher blog. When you choose WordPress, you have two options available to you: hosted (WordPress.com), or self-hosted (WordPress.org).
The hosted version comes with all the previously mentioned drawbacks of free blogging platforms. That’s why you want to choose the self-hosted version.
Why Choose Self-Hosted WordPress for Your Teacher Blog?
WordPress is a well-established, mature software product currently powering millions of websites across the globe. It’s a powerful platform with thousands of developers who create plugins, themes, and extensions – all of which contribute to the platform’s impressive features and functions.
WordPress is also fast as it uses cache functions to speed up your website. All of this is done for free, and you never have to lift a finger. The software also has fully integrated SEO features which makes it a lot easier for your audience to find your website through Google and other search engines.
Here Are Some More Reasons to Choose WordPress
- WordPress installs easily, you can do it in one click
- The software is super easy to use, making it ideal for beginners
- WordPress is fully customizable and no coding experience is required
- WordPress integrates with countless plugins to extend website functionality
- The blogging platform allows you to monetize your website in a variety of ways
- There’s a large, helpful community of developers and users
- WordPress is professional-looking, great performing, and secure
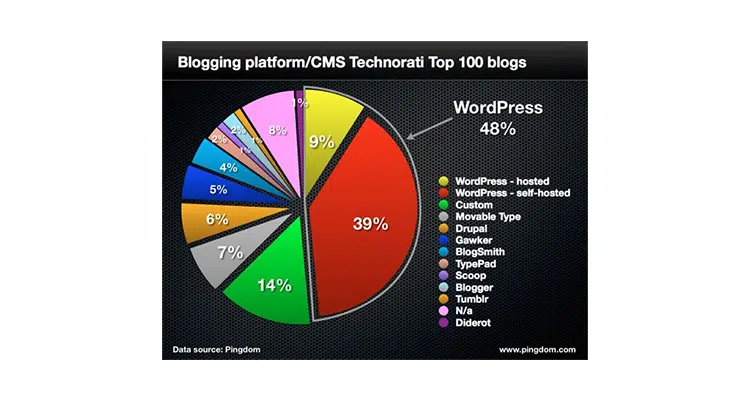
If that is not enough to convince you that WordPress is the absolute best blogging platform to use, take a look at these recent statistics on current WordPress use:
- Over 35% of websites are powered by WordPress
- WordPress is used on over 60% of CMS built websites
- Over 661 WordPress websites are built on a daily basis
- 400 million people visit WordPress websites every month
- This popular software isn’t just for blogging, with 28% of e-commerce using WooCommerce
4. Decide Your Domain Name
A domain name is simply the name of your blog or website. It is the internet address or URL where your audience will be able to access your content.
You can have a domain name that is different from your blog name, but it’s advisable to use your blog name as your domain so as to avoid confusing your website visitors. So, for example, if you want to call your new teacher blog “Best Teacher Blog”, then your domain name will be “BestTeacherBlog.com”.
It’s also worth making a distinction with your blog name to help visitors understand who your target audience is (the general population or other teachers). The best teacher blogs, for example, have certain words to help discern them from other blog types (e.g. TeacherToolKit)
Many people find the process of choosing teacher blog names overwhelming, and they get stuck here. But it’s worth remembering that the top teacher blogs also started from scratch.
To help you avoid this common pitfall, I have created a list of 10 tips to help you come up with a great domain name for a new teacher blog.
1. Buy a.com Domain Name: There are tons of education-related domain extensions, such as .blog, .education, and so on. But since the majority of websites on the internet are registered with .com domain extensions, I recommend that you choose this for your new blog.
2. Make Your Name Broad: When starting a new teacher blog, you want to find a name that is unique, authoritative, and easy to recall. However, don’t make your name too narrow as this will limit the growth of your blog in the future.
For instance, a name like “Easy Learning Online” is better than “Grade Four English Lessons”, which would confine you to just a small range of topics.
3. Keep It Short: As a rule of thumb, it’s better to choose shorter educational blog names. This is because it makes it easier for your audience to remember the name and type it into their browsers when they want to visit your site. Also, avoid using dashes or hyphens between words.
4. Use Alliteration: Alliteration is using two or more words that start with the same letter or a similar sound. Examples of names that use alliteration include, “Secondary Solutions”, “Busy Bees”, “Can Do Kinders”, etc.
5. Get Creative: When starting a teacher blog, you will likely want a really authoritative-sounding name. However, odds are the name is already taken. What you can do is use creativity to get a name you like. One way to do this is by using synonyms.
Say you wanted the name “First Grade Fun” for your blog. If it was already taken, you might settle for a name like “First Great Delight“, instead.
6. Add Extra Words: If you’ve tried everything else and you still can’t get the name you want, try adding extra words, such as “the“, “blog“, “educator“, “class“, and so on. So, a blog name like “Busy Bee”, would become, “The Busy Bee”, instead.
7. Think of a Concept: One of the things you can do to help you come up with unique teacher blog names for your blog is to think of a concept around it.
- In what ways could your blog be branded?
- How can you expand it in the future?
Also, think about how your content might change within the next few years. All of this will help you in brainstorming unique names that are aligned with your brand.
8. Use Domain Name Generation Tools: If you’re still unable to come up with a name for your teaching blog, use tools like Lean Domain Search and Instant Domain Search to help you come up with a name. All you have to do is enter some keywords and the tool will come up with a variety of possible names for your blog.
9. Don’t Buy a Domain Name: You may find the name you want on sale for hundreds, and possibly even thousands of dollars. Resist the temptation to buy it, and rather get a standard domain. Focus on building your blog and making it profitable first. Later, when your blog starts making money, you can then consider buying any domain name you want.
10. Do Not Get Stuck Here: You will be surprised just how many people never make it past the stage. They get so bogged down in trying to come up with the perfect educational blog names that they never get around to building the actual blog.
Taking action is more important than the name you choose. So pick a name that you’re happy with, and move on to the next step.
To help you in this regard, I’ve also included some examples of popular blog names in different educational niches, as well as the reasons why the names make sense. There’s also a list of 10 names for teaching blogs to give you inspiration and get your creative juices flowing.
Examples of Popular Teacher Blog Names (and why they make sense)
- Cool Cat Teacher: This blog uses alliteration for a unique name that is easy to remember.
- Study Hacks: This blog name is short, easy to recall, and it makes it clear what the blog is about.
- Thesis Whisperer: This name works because it’s short and descriptive of the type of blog niche. It also uses a keyword in the title which helps with search engine optimization.
- Principal’s Page: This is another example of how to use alliteration to create a name that is unique and memorable.
- Teen College Education: This blog offers practical advice to teens and tips on maximizing college potential. As with the example above, this blog uses keywords in its name and makes it clear what niche it’s in.
Here Are 10 Creative Ideas for Teacher Blog Names for More Inspiration:
- Surfin Through Second
- Tales of a Sixth Grader
- From Third to Fourth
- Teaching, Dreaming, Learning
- Elementary Matters
- The Realistic Teacher
- Fun in First Grade
- Innovative Connections
- The Teachers Chatterbox
- Can Do Kinders
5. Buy Your Domain Name and Hosting
Now that you have decided on a domain name that appeals to you, the next step in learning how to start a teacher blog is to purchase the domain name and your website hosting.
If your domain name is your address on the internet, then your hosting is the real estate on which you will build your home (i.e., your teacher blog).
There are tons of web host providers to choose from, but it’s important to note that they differ widely in the quality of service that they offer.
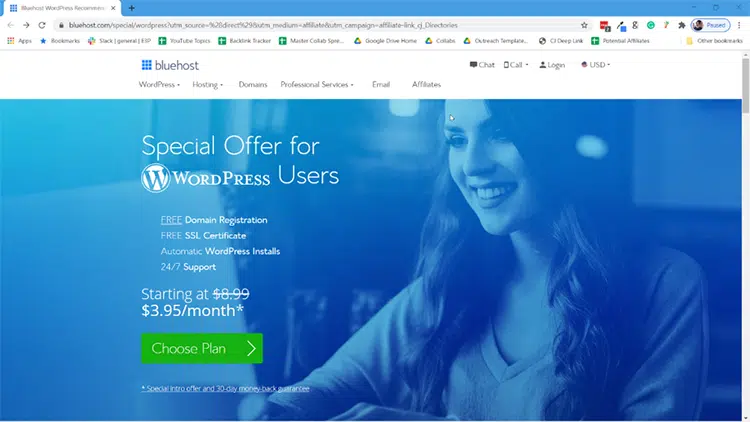
So, when someone types in your website URL, then Bluehost (the host I recommend for beginners) will show your blog to the individual who searched for it.
I’ve created a step-by-step tutorial to walk you through the entire process of buying your domain name and hosting. The first thing you need to do is click on this link to visit Bluehost and follow along with the tutorials below.
Below is a YouTube video and screenshots showing you the exact step-by-step process, choose whatever tutorial that works best for you.
Step 1: If you haven’t yet, click on this link and you’ll be brought to the WordPress Hosting page that you see below.
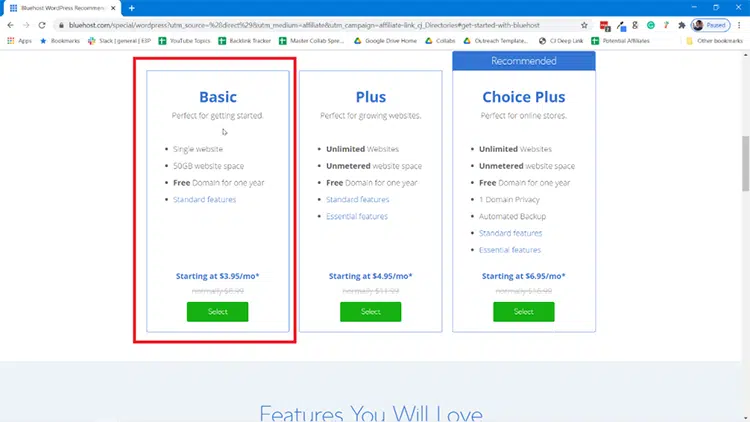
Step 2: Next, you’ll be brought to the hosting plan page. You could choose to get a “Plus” or “Choice Plus” plan, but honestly, that’s not a requirement.
The Startup plan is the cheapest at $2.95/month through my link vs. the normal $8.99/month.
This plan has everything you need including 50GB of webspace (plenty of room for your files), a free domain for a year, plus other standard features like a free SSL and a secure WordPress install. Feel free to browse a bit to decide the right plan for you, but rest assured that Basic will work just fine if you want to minimize your investment.
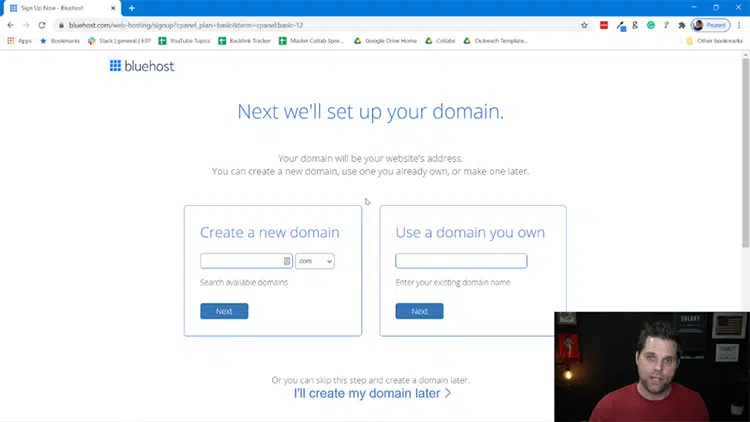
Step 3: After clicking into the plan, you’ll be brought to the next page where you will type-in your new domain, or you can just choose “I’ll create my domain later” if you haven’t decided on one yet. The domain is the URL people will type into a browser to view your website in the future.
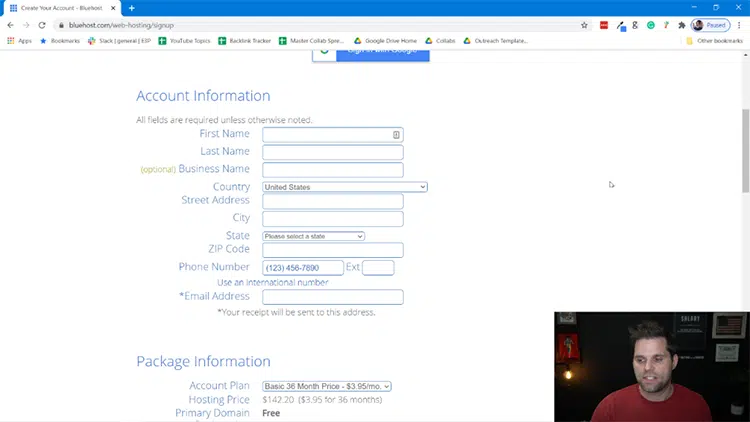
Step 4: Once you submit, the next page will ask for all of your information. That will start with your account information, which is self-explanatory.
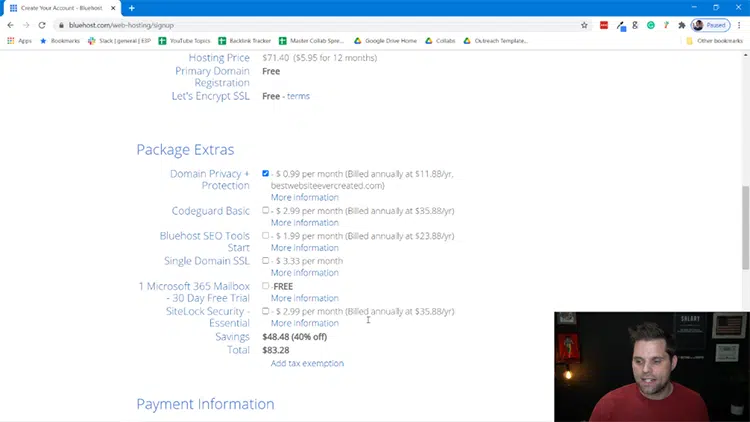
Step 5: Next, you’ll have to input your Package Information. This is to choose how long you want the plan to go for. My advice is that you choose 24 months to get the discount and save some money, but you can go as low 12 months if you want.

Step 6: Next you’ll have to choose what “Package Extras” you want. You can scroll over “More Information” to understand what each of these items are, but here is my own advice.
I would get the “Domain Privacy + Protection”, this makes it so that no one can tie your name to the domain name you create. To me, the only other one worth considering is “Codeguard Basic”. The other two I wouldn’t personally get. But choose what is best for you.
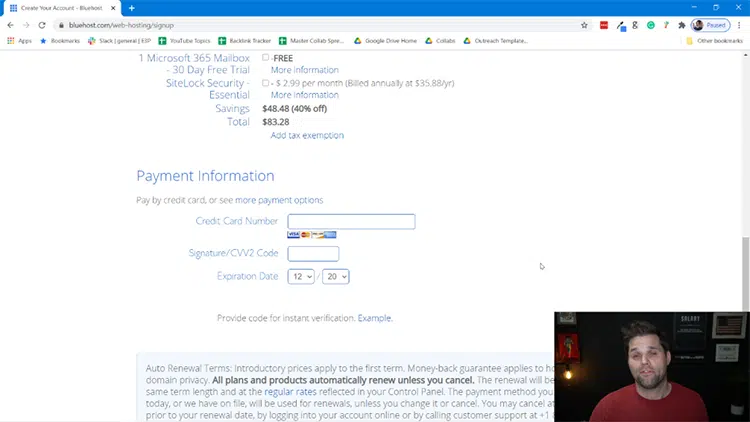
Step 7: The next step is Payment Information, which is self-explanatory.
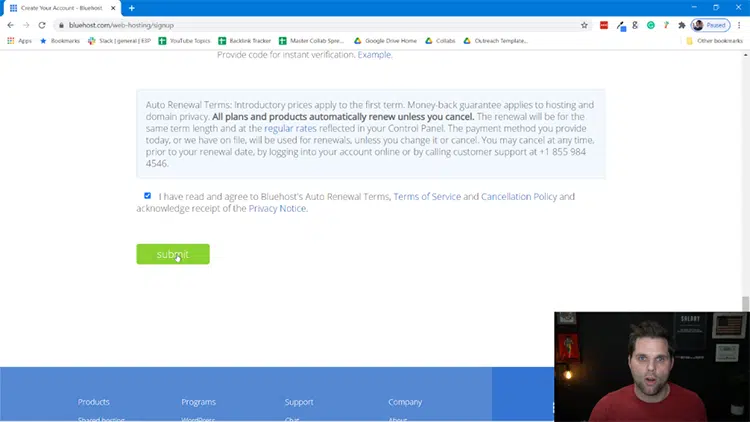
Step 8: And the last step of signup is to confirm that you read and understand the Bluehost Terms of Service, Cancellation Policy, and Privacy Notice. Click the check button and then click “Submit”.
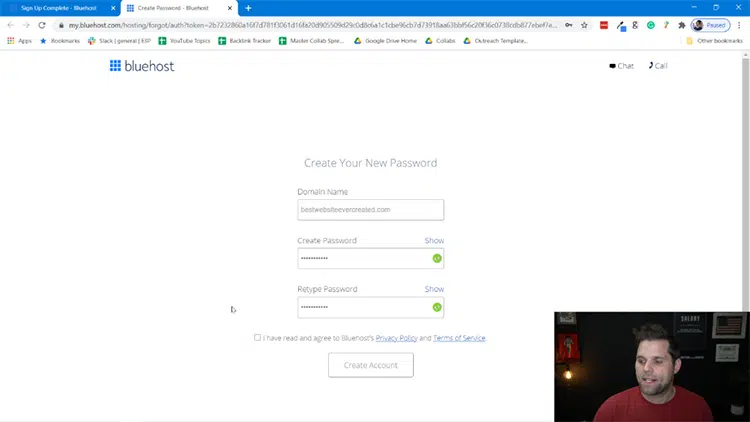
Step 9: Next you’ll be prompted to create an account and password. This is the information that you’ll use to login to the Bluehost platform to manage your site and account info.
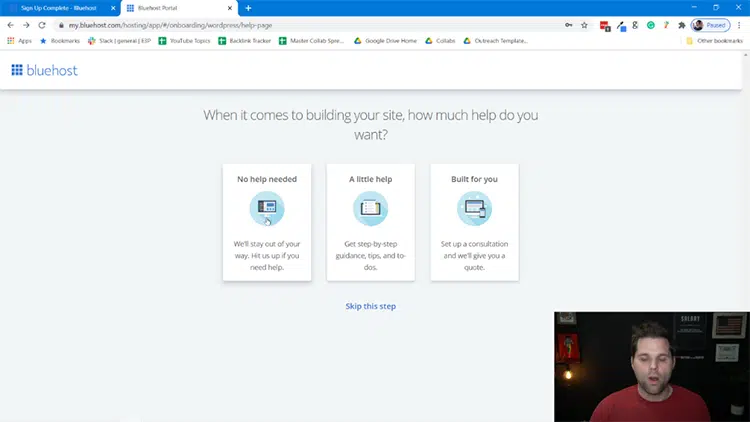
Step 10: At this point Bluehost puts you through a short questionnaire to better understand your scenario. You can answer all of these questions, or click “Skip this Step” on the bottom. If you’re a newbie, I advise you to answer the questions as it’ll help your onboarding experience.
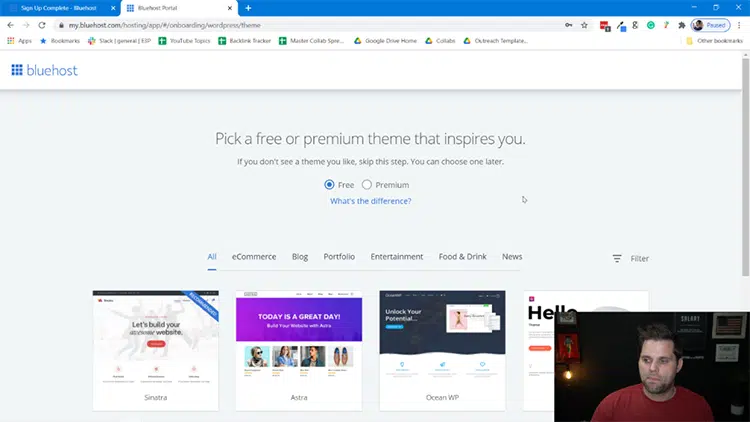
Step 11: After you’re done with that you’ll be advised to choose a theme. For now, you can just choose to use a free theme. You can always replace the theme later if you’d like.
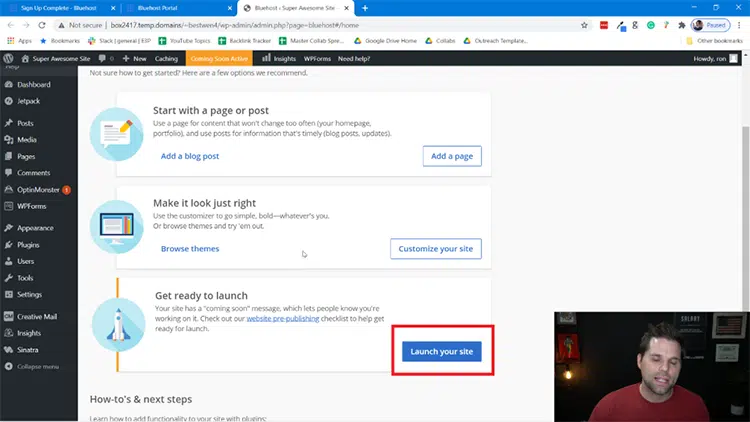
Step 12: From there, you’ll be brought into the backend of WordPress in the admin panel. This is where you’ll manage your site from. You can add posts/pages as you see fit, but when you’re ready click on the blue button that says “Launch Your Site”.
Step 13 (Final): Your blog is LIVE. Just go to a browser and type in your domain name. Once you do this, you’ll be able to access your website!
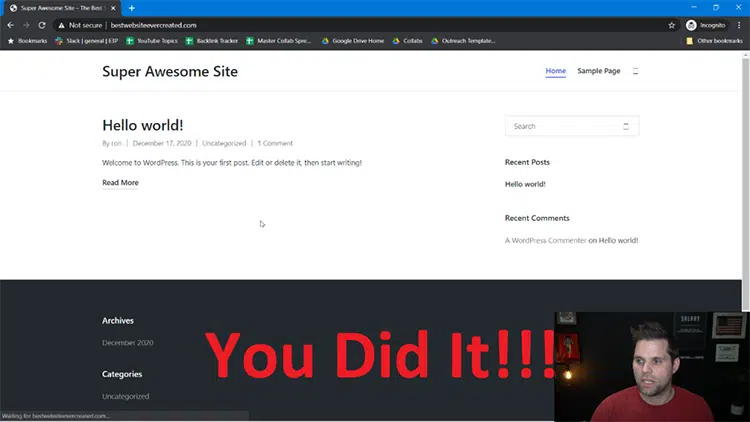
Congrats! You officially have a website.
If you’re wondering how to edit things on the website, all you have to do from here is go to your website URL with /wp-admin at the end in a browser and login.
Example: http://mostawesomewebsiteever (dot) com/wp-admin
And don’t worry, we cover how to edit things more in the rest of this guide as well. So please continue reading.
Sidenote: If you decide not to use Bluehost for some reason, make sure your host offers SSL certificates. This is important for your site visitor security. Even if they do offer it, you may want to consider getting an SSL certificate for a lower cost over at SSL2Buy.com.
6. Choose and Install a Theme For Your Teacher Blog
As you have seen from the steps above, there is no deep technical knowledge required for you to build your own website.
Now that you have everything set up, it’s time to choose and install a theme for your blog.
A theme is software that determines the design and layout of your blog and how it looks. There are different themes for different types of blogs, and there are themes that are specifically designed for teacher websites.
As with most other tools and software online, some themes are free and others cost money. I recommend that you choose a premium WordPress theme as it comes with many benefits that will ultimately help you in making your blog more popular and successful.
Listed below are the benefits of a paid WordPress theme over a free one.
Why Choose a Premium WordPress Theme?
- User-Friendly: WordPress themes are easy to use and require no coding knowledge or experience.
- Unique Designs: Premium themes also come with unique, professional-looking designs and full customization features to make your blog stand out.
- Mobile-Friendly: All WordPress themes are designed to be mobile friendly and they look great on devices of all sizes.
- SEO Friendly: Premium themes are search engine optimized to help you build great performing, high-ranking websites.
- Great Support: Paid themes come with reliable tech support, making them ideal for beginner teacher bloggers.
- Enhanced Security: WordPress themes also come with robust inbuilt security features to keep your website safe.
I hope by now you are convinced that choosing a premium WordPress theme is the way to go. To help you in finding the perfect theme for your new teacher blog, I have included a few great themes that you can choose from.
Here are a few examples of themes that are great for a teacher blog:
- Divi: If you’re looking to design a stunning website with ease, Divi from Elegant Themes stands out as arguably the best WordPress builder available today. Its intuitive visual drag-and-drop interface empowers users to craft amazing sites quickly. What sets Divi apart is its vast array of customizable modules, real-time design feedback, and a responsive editing feature that ensures your website looks impeccable on any device.
- Astra: While Divi is renowned for its versatile design capabilities, the Astra theme offers a distinct set of advantages for those prioritizing speed, performance, and seamless integration. Astra stands out for its feather-light weight, ensuring that websites load at lightning-fast speeds—a critical factor for SEO and user experience. Moreover, Astra’s deep compatibility with major page builders, including Elementor and Beaver Builder, means that users aren’t restricted to a single design environment. The theme is also built with a focus on customization as well. You can read my Astra Theme Review if you want to learn more.
- Themeforest.net: Themeforest has a significant amount of themes far beyond other platforms out there. There are over 48,000 total themes available on this platform, so you can find whatever you need.
Studiare – Education Theme for University & Online Courses
This theme is perfect for teacher blogs. It has WooCommerce functionality and allows you to offer free courses. It comes with a WPBakery Page Builder as well as the revolution slider to help you create attractive pages.

This WordPress theme is perfect for teachers, master coaches, tutors, and other educators who want to offer online classes. With it, you can create a unique LMS training tutorial website or an online learning academy.

Edubin – Education HTML Template
This theme comes with multiple homepage variations and a clean and responsive template that will help you hit the ground blogging. It’s perfect for online courses, universities, schools, and all other educational institutions.

LearnUp – Education HTML Template
LearnUp WordPress theme has a wide variety of pages and templates to choose from. That theme comes with a lot of amazing features, including Advanced Search and Multi Header features. With this theme, you can set up a unique and professional-looking teacher blog in just minutes.

Simple Article – WordPress Theme For Personal Blog
This WordPress theme is designed for personal blogs, but it’s also great for educators who want a clean, simple, and minimalist theme. It’s fully responsive and comes with an impressive page builder as well as for blog layouts to help you get up and running quickly.

These are just a few of the countless educational blog themes that you can choose from.
Just keep in mind that not all themes are created equal. There are some important factors you need to consider when choosing a theme for your new blog.
Here’s What You Should Look for in a Good Theme:
- Speed: You must choose a theme that is fast for a great-performing website
- Beautiful Designs: The theme you choose must come with stylish, professional-looking templates
- Mobile Responsiveness: You want a fully responsive theme that will look great on all devices
- Easy Customization: Your theme must be easily customizable, allowing you to match your style
- Reliable Support: The theme should offer prompt and responsive technical support
- Reviews and Ratings: The theme you choose should have tons of great online reviews from actual users
- Established Brand: Choose a theme from a well-known brand with longevity
Once you have found a teacher blog theme that you like, it’s time to get started building your blog.
In the next step, we will take a look at the essential website pages you need to create before you can start blogging. But first…
A Word of Advice
When most teacher bloggers first use their sites, they start to tweak their themes. Many spend countless hours on the look and feel of their new blog, and never get around to creating content.
Avoid this pitfall at all costs. After all, once you start creating and publishing content, you will be able to build and grow an audience, and then be able to tailor your blog design according to the preferences of that specific audience.
So don’t spend an inordinate amount of time trying to come up with the perfect font/colors/layout/design at the start because you will likely have to change it as time goes on.
7. Create Essential Pages & Logo
In this section, we’re going to take care of your website’s basic structure. There are certain pages that you need on your site, including the About page, Contact page, Resources page, and Privacy Policy page.
These are different from your blog posts in that they are static pages with information that doesn’t change often.
Below, we’ll go into a bit more detail on what you should include on each of these essential pages.
About Page
This page explains to the world who you are. It gives your audience information on what you’re trying to achieve with your teaching blog.
Make sure you include information that helps readers get to know you and understand the purpose behind your blog. Make it clear how you will help them, and what they stand to benefit by reading your blog. You can also include an image of yourself on this page.
Since the “About” page is one of the most visited pages on any blog, it’s prime real estate that you should leverage to get your audience to take some sort of action. For instance, you can ask them to connect with you on various social media platforms. You can also ask them to sign up for your newsletter, and so on.
Contact Page
This page should contain all the information your readers need in order to get in touch with you. You can include your email address, phone number, Skype, social media profiles, etc. Also, include a contact form to make it convenient for anyone who wants to get in touch with you quickly.
It’s a good idea to include an FAQ section on this page with all the most commonly asked questions. Also, you can use “at“, instead of “@” and “dot” instead of “dot” in order to lessen your chances of getting spam in your inbox.
Privacy Policy Page
This page should include text explaining exactly what type of information you collect from users, as well as what you use the data for. Check out my list of the best privacy policy generators for free and paid options to help.
You can either use their free version, or you can pay a professional to create your Privacy Policy and other legal documents for your website.
Resources Page
As an educator, your main goal is to provide the best value to your audience and help them to reach their learning goals in the most effective way. You may not have all the content necessary to achieve that on your own blog, but you can link to other content online from your resources page.
On this page, you can include a list of courses, e-books, white papers, or other websites that you feel are useful for your audience.
Not only does this help your readers, but it also shows Google and other search engines the theme your teacher blog falls under. Furthermore, if you write guest posts on other blogs in your industry, you can mention those website details on your Resources page
Create a Logo
It’s also a good time to focus on creating a logo for your educational blog. There are a LOT of different ways to do this, but I’m a big fan of using one of these popular logo makers.
8. Begin Blogging
This is probably going to be the most fun section for you. But what exactly are you going to write about?
Depending on the niche you choose, you will either be creating content for teachers, students, and/or parents. Use your chosen niche as a guide for your content strategy. You can break your main topic down into different categories, and then create posts for each category.
Each post that you write on your blog should fall under one of your categories. Follow the theme and avoid writing randomly, as this might alienate your audience and make it hard for you to grow your blog. Check how other top teacher blogs are doing it and learn from them.
Over time, you will become an expert on those subjects. It’ll also be easier for your target audience to find you online, thereby helping you to grow your audience a lot faster.
Ideas for Blog Posts:
- Welcome Post: Write a post on why and how you started your teaching blog
- List Posts: Create a list of resources that your audience would find useful, such as “10 Popular Teaching Blogs You Must Follow.”
- How-To Posts: Create “How-to” posts to answer commonly asked questions in your niche (you can find these questions by browsing through forums and groups, as well as the comments sections of other blogs in your niche. For example: “How to use A Free Debate Lesson Plan“
You can also create these types of articles:
- Pros and Cons Article
- Things to Do Article
- Checklist Article
- Things to Do Article
- Goal Setting Article
- Personal Story Article
- Problem and Solution Article
- Holiday Article:
Share how your thinking has changed over the years. Ask questions that you are wondering about. Answer other people’s questions. Review books and host giveaways. Talk about education conferences that you attended or presented at. Share classroom management ideas (yours and other people’s). Rant about hot topics in your niche, reflect on ED news, and give your opinion on current trends in the industry – The list of topics to write about is ENDLESS!
Building a successful education blog comes down to a few important factors:
1. Your Blog Must Solve a Problem: Do your research and find out what people in your ideal audience are searching for online.
- What articles are they reading?
- How do they prefer to consume their content?
By offering a solution to their problems in a way that they find engaging, you make it more likely that people will regard you as an authority on the subject and return to your blog in the future.
2. You Must Bring Something New: A lot of people are interested in different things, but they lack the knowledge or skills to create the results they desire.
For instance, you may have a better way to teach English, or maybe you have a different approach to how teachers should teach spoken performance – whatever you can contribute toward making an existing practice better will help to set you apart from the majority of teaching blogs out there that are just regurgitating information that is easily found everywhere else online.
3. Help Readers Achieve a Goal: Your content must help teachers, students, or parents to reach a particular goal. For the most part, teachers have common ambitions. They want to make their classes more interesting, to work with more current materials, have better worksheets, etc.
What tools or resources can you create on your teaching blog to help make this happen for your audience? When you can help people reach their goals in an easier, quicker, more effective way, the success of your blog is virtually guaranteed.
Important Note:
Make sure you have at least 10 articles published before you start promoting your new blog. When you invite your audience to visit your blog, you don’t want them to arrive at an empty blog.
Your blog should look lived in, so make sure it is populated with at least 10 posts in a variety of categories. This will help you to appeal to a wider audience, as well as to maintain a high level of engagement with your visitors.
9. Promoting Your Teacher Blog
Once everything is in place, it’s time to get visitors to your blog. Although there are many different ways to promote your blog, there is also a lot of competition for eyeballs on the internet.
However, with the right blog promotion techniques, you will soon have a steady stream of traffic flowing to your new blog.
Below I’ve listed some of the most effective techniques you can implement to get your content in front of your target audience.
Tell Friends and Family: Once your blog is live, share it with your family and friends. Ask them to visit your blog, read your posts, and share your content with others on their own social networks. This will give you additional exposure and get more traffic to your site.
Use Social Media: If you are already on social media, you can leverage your profiles to get your new teacher blog in front of a vast audience. Alternatively, you can create new profiles and pages for your blog and start promoting your content there. If you put a lot of your focus here, I highly recommend that you check out these social media management tools as they’ll save you a ton of time.
Join Teacher Clubs on Facebook: A great way to get your blog in front of your target audience is to join teacher clubs on Facebook. These spaces will expose your blog content to a massive audience of like-minded people. Just remember to offer value to others before asking them to check out your blog, instead of just spamming the group with the link to your blog.
SEO: Search engine optimization is and always will be one of the best ways to promote your blog online. Most of the people who will find your content are going to do so through searching online.
That’s why you need to create high-quality content that is packed full of value and infused with important keywords in your niche so that Google and other search engines rank your pages high in search results.
Guest Posting: Also known as guest blogging, this blog promotion technique involves writing posts for other popular blogs in your niche and then linking back to your own website. This is a great way to reach new audiences and grow your website traffic fast.
And remember, you need to have at least 10 posts published on your blog before you implement any of the blog promotion strategies outlined above.
It’s also a good idea to have a few posts written and scheduled so that you don’t have to worry about creating content and focus more on promoting your blog during the early days.
Don’t let your brand stop there though, if you want to keep spreading awareness about your blog beyond text, consider creating a classroom teacher podcast where connect with other professionals.
10. How to Make Money as a Teacher
Most people who start teacher blogs do so for the love of it. And while, in the beginning, your teaching blog might be a personal pursuit, in time, you might become interested in learning how to make money as a teacher since hosting a blog incurs certain costs.
Whether you started your blog as a hobby or you had the intention of monetizing it right from the beginning, use the strategies outlined below to help you start making money from your teaching blog.
Affiliate Marketing: This is a great blog monetization technique for beginners. It doesn’t require that you have a huge audience in order for you to start making money. The trick is to ensure that you are marketing relevant products to an engaged audience.
You can join education affiliate programs and get paid a percentage for each sale generated through your recommendation. Affiliate networks for educators include:
- Amazon Associate Program
- The Scholastic Store Online
- The Microsoft Education Affiliate Program
- Rosetta Stone
- E Learners
- Essay Edge
- NewEducationJobs.com
- TextbookX.com
- Kaplan
- Academic Superstore
Offer Services: A great way to start making money from teacher blogs right away is to offer freelance services. You can work as a freelance writer or editor. You can also offer photography services, web design (this becomes very scalable if you use the best web design software), digital marketing, social media management, and so on.
Whatever skills you have that you think your audience might benefit from, you can offer those services as a way to monetize your blog.
Google Adsense: Yet another great way to make money from your teaching blog is to use Google AdSense or one of the industry-leading Adsense alternatives. Signing up is easy, and this is a relatively maintenance-free way to make passive income from your blog.
Once you’ve been approved for the program, Google will show ads to visitors on your blog, and you will get paid a small amount for each ad click.
Selling Teacher Merch: There is a wide variety of things you can sell on your blog, including teacher gifts, custom, handmade, funny, or novel products, including T-shirts, stickers, bags, mugs, posters, home decor, and much more.
Selling Lesson Plans: This is a popular monetization method for a lot of teaching blogs. It involves creating and selling lesson plans on your blog. One of the best things about creating digital products like these is that you only have to do the work once and you can sell the product multiple times. There’s a great platform out there called Teachers Pay Teachers (In the industry known as “TPT”) that allows you to sell printable teaching resources and lesson plans to others.
If it makes sense, you may even want to consider making money with Audible by selling audiobooks on your subjects as well.
Publish Sponsored Posts: As your blog grows in popularity, you can set up a sponsor page outlining the details of sponsorships with your blog. Brands will pay you to write posts or reviews of their products that you can then share with your audience.
How to Start a Teacher Blog: The Final Word
The Internet is undoubtedly the best place for individuals to become entrepreneurs and forge their own paths. As an educator, you can use a blog as a way to make money while sharing your knowledge and expertise with an eager audience.
Follow the steps outlined in this guide on how to start a teacher blog, and you will be running a successful and profitable educational blog in no time. I wish you good luck, and I hope your blog becomes one of the best blogs for teachers, students, maths, coding – whichever niche you pick!
This is my second attempt at a teacher blog and I’m doing way better than I did when I started my first one. Thank you for the tips.
No problem, Shannon! Stay tuned, I’m going to have courses and more in the future to help MUCH further than what I did here 🙂
This guy is the man!!! My hat is off to you 1hr professor. Just read this great content at my desk and lifted my day
Thanks Rudy!